Emerald green French tip nails are the jewel box moment your manicure routine has been waiting for. As wardrobes shift toward knits, velvet, and warm metallics, a deep emerald tip feels like wearing a precious stone on your fingertips — rich enough for holiday parties and evening events, yet polished enough to carry an everyday outfit. It photographs beautifully, it flatters every skin tone, and it never looks like you tried too hard.
What makes emerald so versatile is how dramatically the mood changes with the finish. A classic glossy emerald tip over a sheer nude base reads timeless and elegant, a matte version feels modern and understated, and a cat-eye or chrome emerald leans glamorous and bold. Compared with classic white French tips, emerald adds depth and color while keeping the clean, structured French shape that makes hands look neat and elongated.
In this guide, you will find 20 emerald green French tip nail designs to try, each with a photo and practical pointers for recreating it at home. You will also get product guidance, comparison tables, an 8-step DIY tutorial, tips for making your manicure last longer, common mistakes to avoid, at-home cost estimates, and answers to the most common questions about emerald French tips.
Top Emerald Green French Tip Nails to Try
1. Classic Emerald French Tips
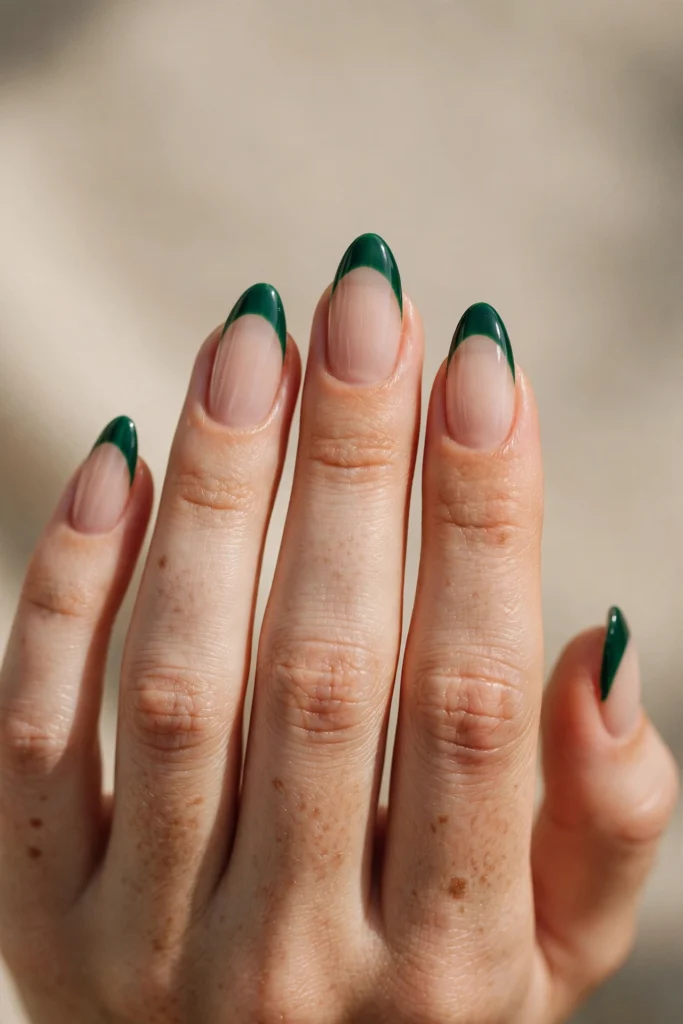
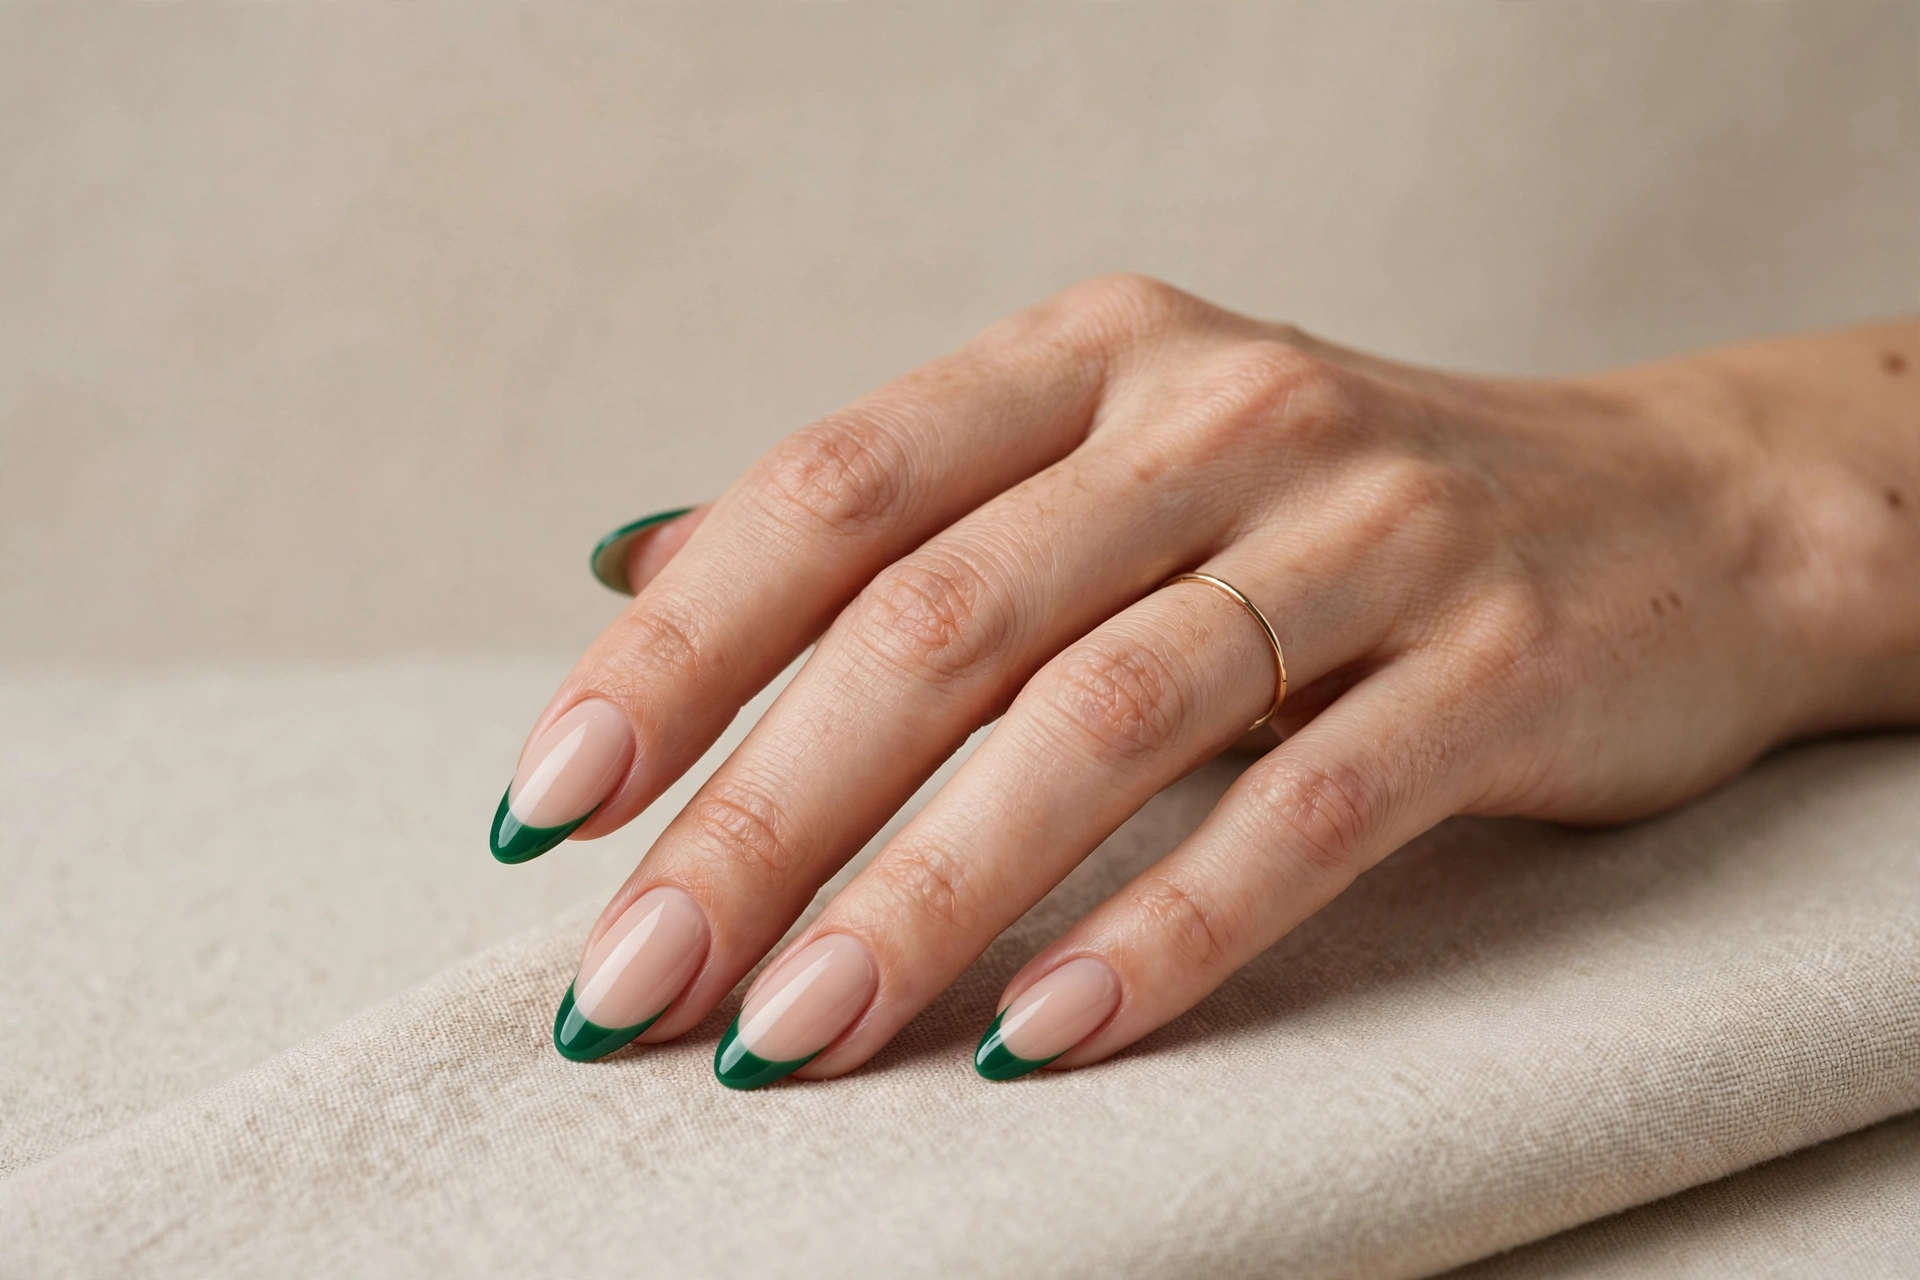
The classic emerald French tip is where every green lover should start: a sheer nude base flowing into deep, glossy emerald tips on an elegant almond shape. The jewel tone does all the talking, so the design stays clean and intentional with no embellishment to distract from the color placement. It suits work, weddings, and holiday dinners alike, and the almond shape elongates the fingers so the dark tips look refined rather than heavy.
To recreate it at home, begin with a sheer nude or translucent pink base so the nail looks even and clean — a saturated tip color exposes every flaw underneath. Paint the emerald tips in two thin coats with a fine French brush, following the natural curve of your free edge rather than forcing a straight line. Choose a richly pigmented emerald gel or polish so the color reads deep, not grassy, and finish with a high-gloss top coat.
2. Emerald Tips with a Gold Chrome Outline
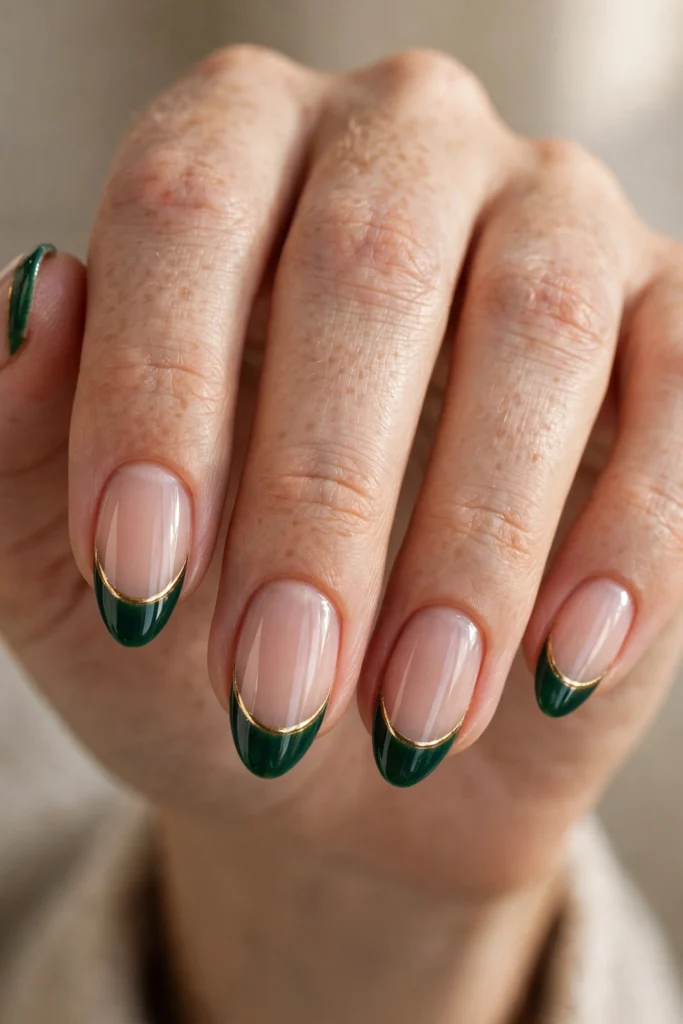
If the classic emerald tip is a gemstone, this version is the gemstone set in gold. A whisper-thin metallic gold line traces the smile line where the emerald tip meets the base, framing the color like jewelry. The effect is subtle from a distance and luxurious up close, which makes it a favorite for weddings, festive dinners, and any occasion where your hands will be noticed. The almond shape keeps the gold line flowing in one elegant curve.
At home, paint and fully cure or dry your emerald tips first — the gold line must go on last so it stays crisp. Use a long, fine liner brush with metallic gold gel paint or striping polish, and draw the line in one slow stroke per nail, rolling the finger slightly as you go. Keep the line hair-thin; if it gets too wide it stops looking like an accent and starts competing with the emerald.
3. Emerald Marble French Tips
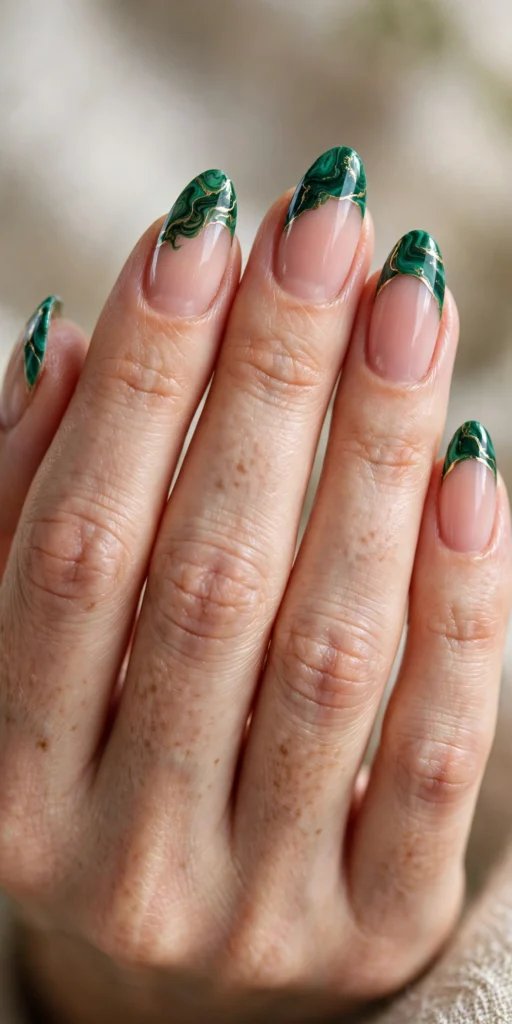
Emerald marble French tips channel the swirling depths of real malachite, the banded green gemstone prized in jewelry and interiors. Layers of deep green, soft jade, and near-black veining melt across each tip, finished with the finest threads of gold, so no two nails are ever identical. Over a sheer blush base the marble looks like tiny pieces of polished stone set into your manicure — artistic, expensive, and endlessly interesting to look at.
The technique is easier than it looks. Paint the tips with a medium emerald gel, then, while the layer is still wet, drag a detail brush loaded with darker and lighter green through it in loose wavy bands. Blur the edges with a barely damp brush for natural veining, add one or two hair-thin gold veins, and cure. Resist over-blending — real malachite keeps distinct bands with soft edges, and so should your nails.
4. Matte Emerald French Tips
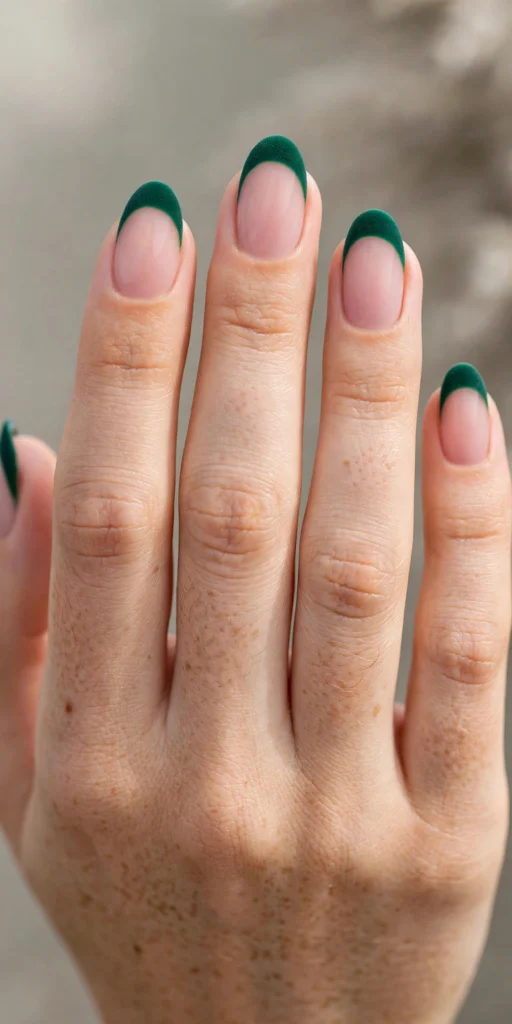
A matte finish turns emerald French tips into crushed velvet for your nails. With no shine to bounce light around, the deep green reads softer, moodier, and quietly modern — the perfect partner for fall knits, tailored coats, and understated outfits. The medium oval shape supports that gentle mood, and a sheer blush base keeps the contrast warm rather than stark. It is an ideal first dark French manicure for anyone who finds glossy jewel tones a little loud.
Creating the look at home is simple: paint your emerald tips as usual with polish or gel, let the color dry or cure completely, then seal with a dedicated matte top coat instead of a glossy one. Apply the matte coat in a smooth, even layer to avoid streaky patches. Keep cuticle oil off the finished surface, since oils create shiny spots on matte nails, and refresh the matte top coat every few days to keep the velvet effect even.
5. Emerald Glitter Ombre French Tips
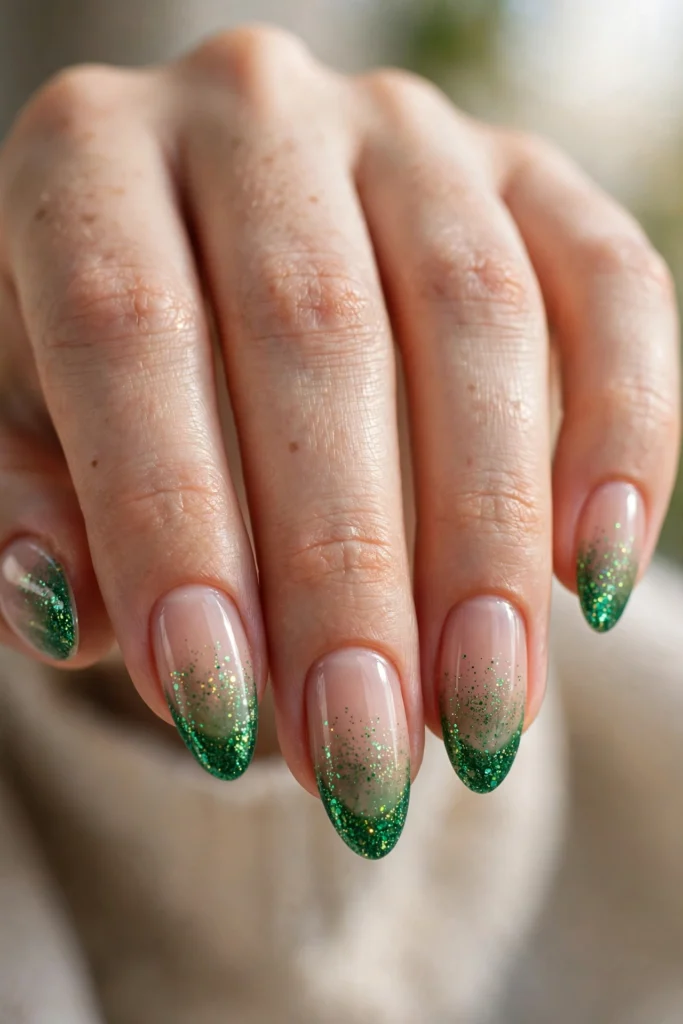
This design lets emerald sparkle do the fading. Dense green glitter concentrates at the very edge of the nail and dissolves gradually into a sheer nude base, like the tip of the nail was dipped in crushed emerald dust. It is festive without a single rhinestone, catches light with every gesture, and feels tailor-made for party season, New Year's Eve, and holiday photos. The almond shape gives the gradient room to stretch and shimmer.
For the at-home version, use a glitter-dense emerald polish or mix fine emerald glitter into clear gel. Dab the glitter at the tip with a makeup sponge or the polish brush, then pull a smaller amount downward in a second pass so the density fades naturally. Two or three passes build a smooth gradient. Seal with a generous glossy top coat — glitter can feel gritty, and one thick layer (or two thin ones) levels it to glass.
6. Emerald Velvet Cat-Eye French Tips
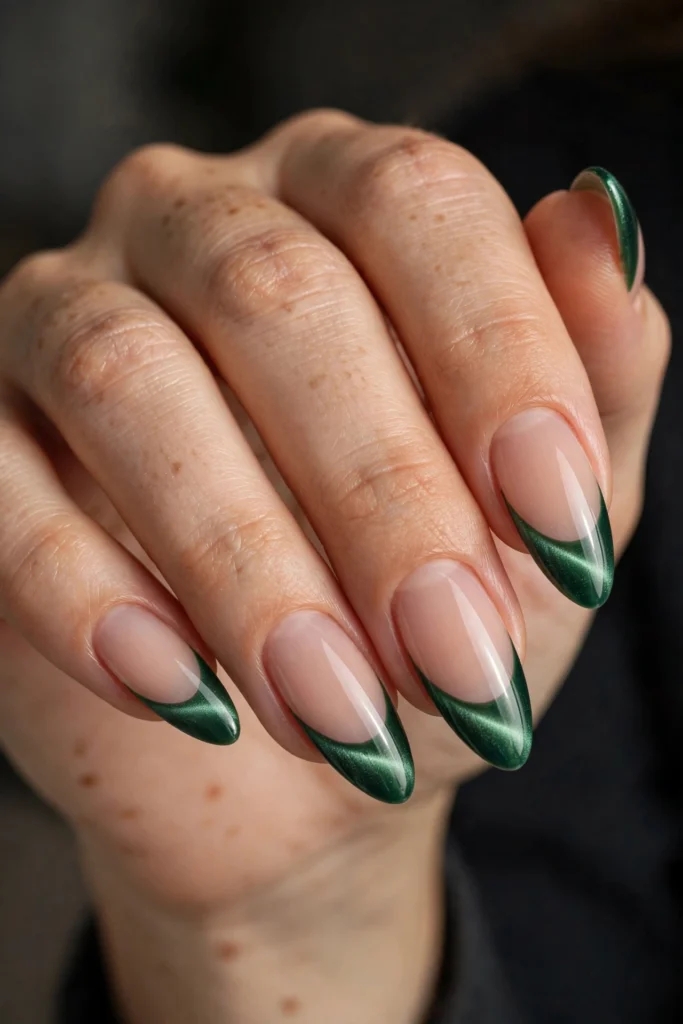
Velvet cat-eye is the texture everyone wants to touch. A magnetic emerald polish swept across the tips creates a plush band of shimmer that moves as your hands move, so the green seems to glow from inside. On long almond nails the effect reads like quiet luxury — mysterious, dimensional, and far more interesting than flat color. It is the emerald design most likely to earn you compliments from strangers, because the finish only fully reveals itself in motion.
The essential product is a magnetic cat-eye gel in a deep emerald shade, plus a small nail magnet. Apply the emerald to the tips, then hold the magnet just above the wet gel for ten to fifteen seconds — a diagonal angle gives a dramatic, sweeping beam. Cure immediately to freeze the particles in place. Work one or two nails at a time so the gel does not settle before you magnetize it, and seal with a glossy top coat.
7. Emerald Micro French Tips
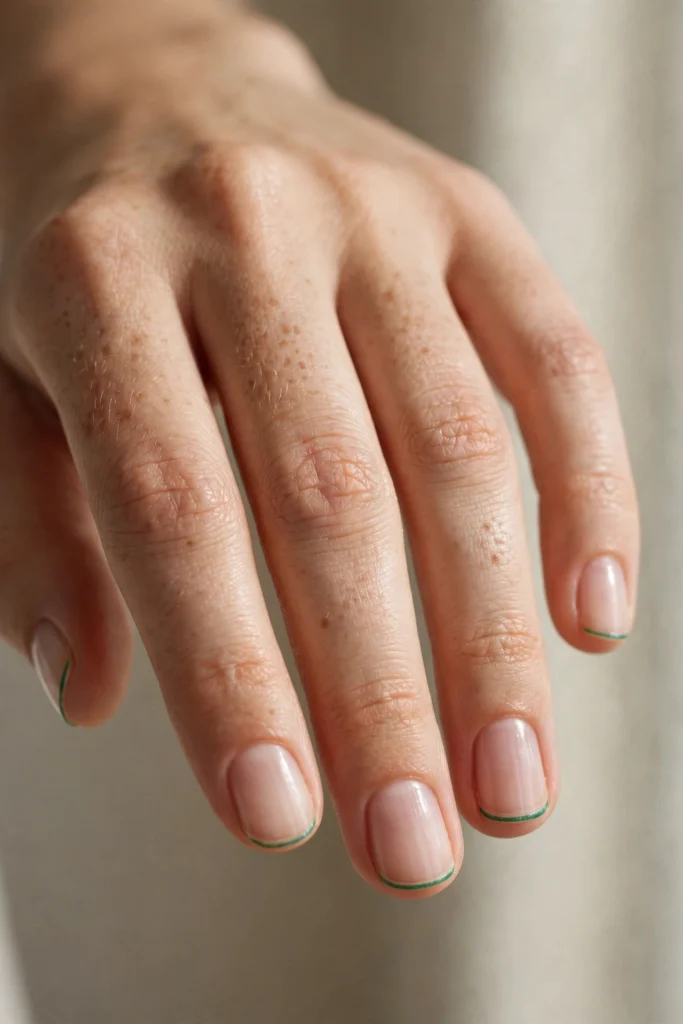
Micro French tips shrink the colored band to a hairline — a whisper of emerald tracing the very edge of the nail. The result is the cleanest possible way to wear a bold color: fresh, minimal, and appropriate absolutely everywhere, from the office to a wedding. Because the line is so thin, it flatters short natural nails and smaller nail beds that a full-width tip would overwhelm. This is also the fastest emerald design to grow out gracefully.
Precision is everything here. Use the very tip of a fine liner brush or the corner of a flat French brush, loaded with a highly pigmented emerald so one pass gives full coverage. Rest your painting hand on the table and rotate the finger you are painting instead of moving the brush in long strokes. Regular polish works beautifully for micro tips, and mistakes are easy to erase with a cleanup brush dipped in remover.
8. Emerald V-Cut French Tips with Gold Foil
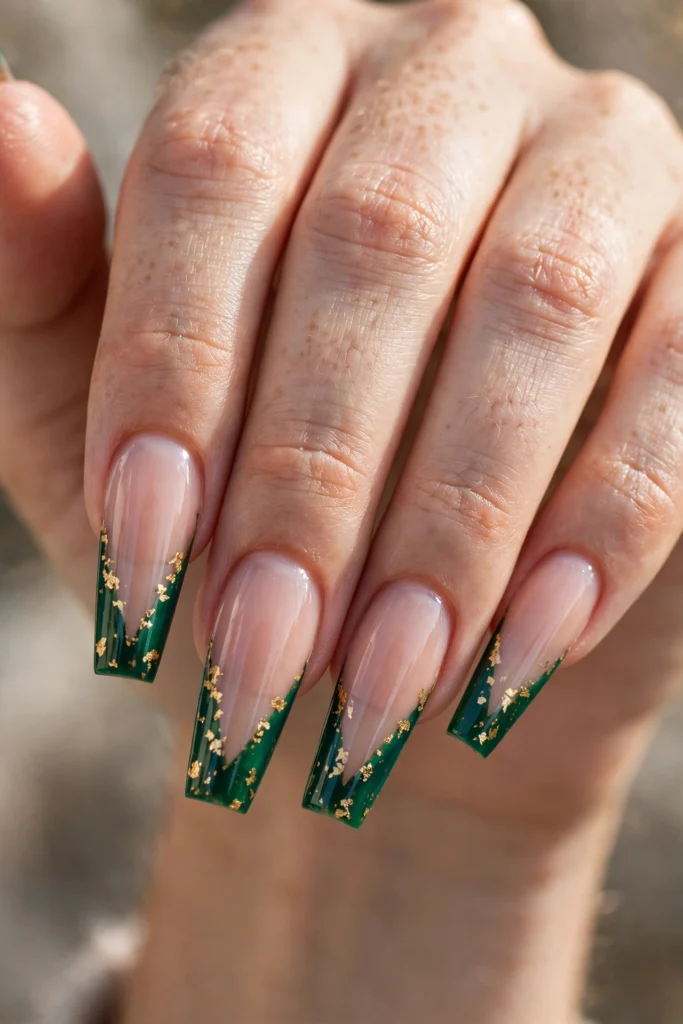
The V-cut trades the soft French curve for a sharp, architectural point, and in emerald with gold foil it becomes pure evening glamour. The deep green V elongates long coffin nails dramatically, while irregular flecks of gold foil scattered through the tip catch the light like fragments of treasure. It is a confident, editorial design — the one to choose for galas, festive parties, and any night your manicure is meant to be part of the outfit.
To build it at home, mark the center point of each free edge first, then paint two diagonal strokes meeting at that point to form the V. Gel gives you unlimited working time to perfect the angles before curing. While the final emerald layer is still tacky, press tiny pieces of gold foil onto the tips with a wax pencil or silicone tool, concentrating them near the point, then encapsulate everything under a glossy top coat.
9. Emerald Ombre French Tips
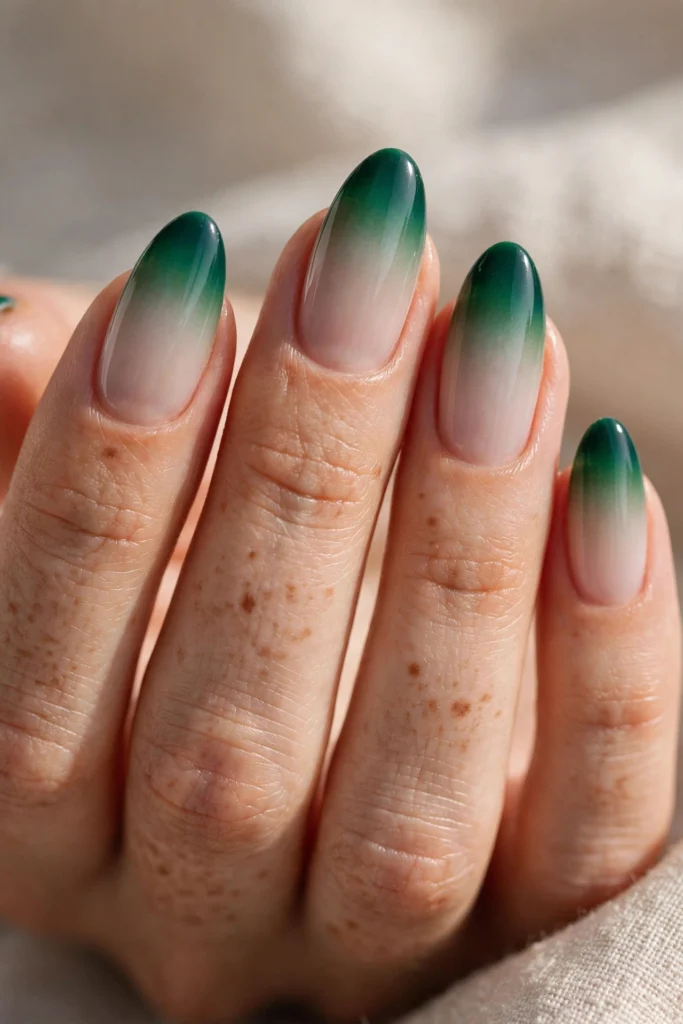
Emerald ombre softens the French structure into a gradient: the color melts from a milky nude at the cuticle through jade and into deep emerald at the free edge, with no hard smile line anywhere. It is the most forgiving dark French design for beginners, because there is no crisp edge to keep perfect, and it looks especially lush on almond nails where the blend has length to travel across. Wear it when you want emerald's richness with a softer, more romantic delivery.
A makeup sponge is your main tool. Paint stripes of your base shade and two depths of emerald onto the sponge, then dab it over the tip area repeatedly, reloading as needed, until the colors melt together. Work in two or three light layers rather than one heavy one — patience is what makes the gradient seamless instead of blotchy. Clean up the skin with a flat brush and remover, then finish with a smoothing glossy top coat.
10. Emerald Pearl French Tips
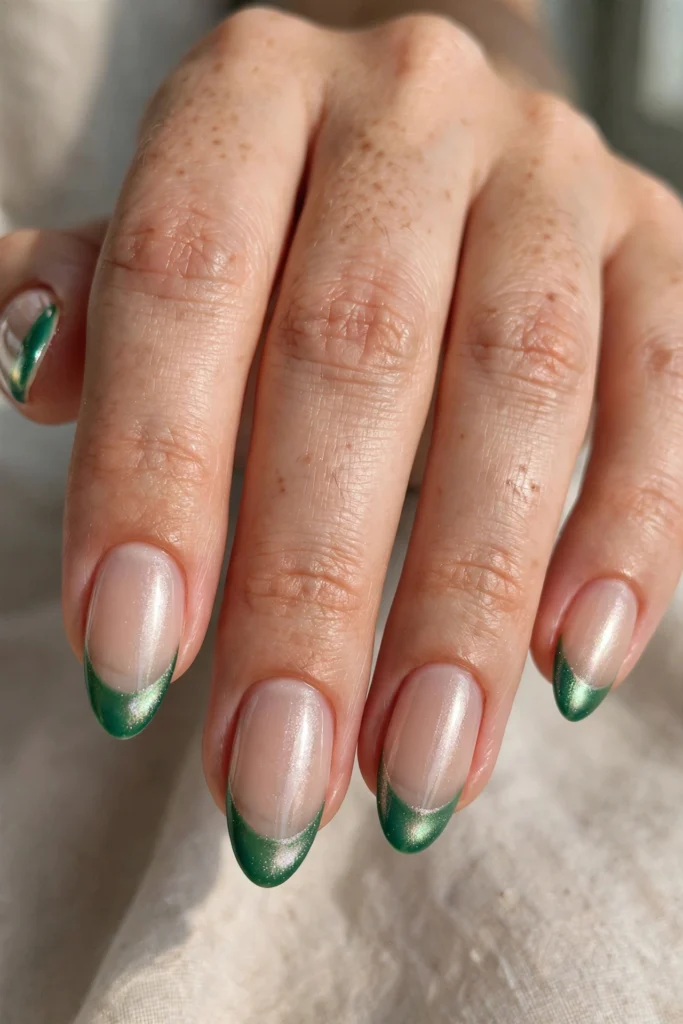
Emerald pearl takes the jewel tone and lights it from within. A fine pearlescent shimmer layered over deep emerald tips gives the green a soft, luminous glow — less glittery than glitter, less flat than cream — that flatters every skin tone and photographs like a dream. It is an elegant choice for weddings, anniversaries, and winter evenings, and on almond nails it reads like light moving across polished stone.
You can achieve the effect two ways. The simplest is a pearl-finish emerald polish, built in two thin coats. More luminous still: paint classic emerald tips, then sweep a sheer pearl or fine iridescent shimmer topper only over the colored area before sealing. Keep the shimmer fine rather than chunky — the goal is a glow, not sparkle. A glossy top coat at the end deepens the pearl effect beautifully.
11. Emerald French Tips with a Rhinestone Accent
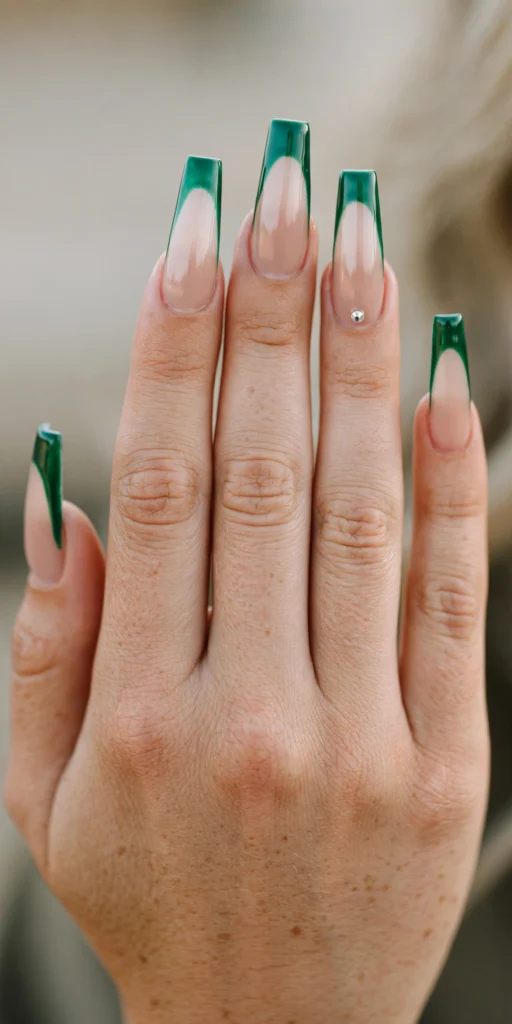
Sometimes one crystal is all a manicure needs. These glossy emerald tips on long coffin nails stay sleek and unadorned except for a single rhinestone placed at the base of the ring fingernail, where it flashes against the deep green like a jewel in a setting. The restraint is what makes it luxurious — the stone gets full attention, and the emerald gets to stay rich and uninterrupted. Choose this design for parties, photos, and evenings out.
At home, complete your emerald tips and top coat first. Place a tiny dot of nail glue or thick builder gel at the base of the accent nail, pick up the rhinestone with a wax pencil, and set it into the dot with gentle pressure. Once it is secure, trace top coat carefully around — never over — the stone, because coating the surface dulls its sparkle. Keep stones small on shorter nails so the proportions stay balanced.
12. Emerald and Black Double-Line French Tips
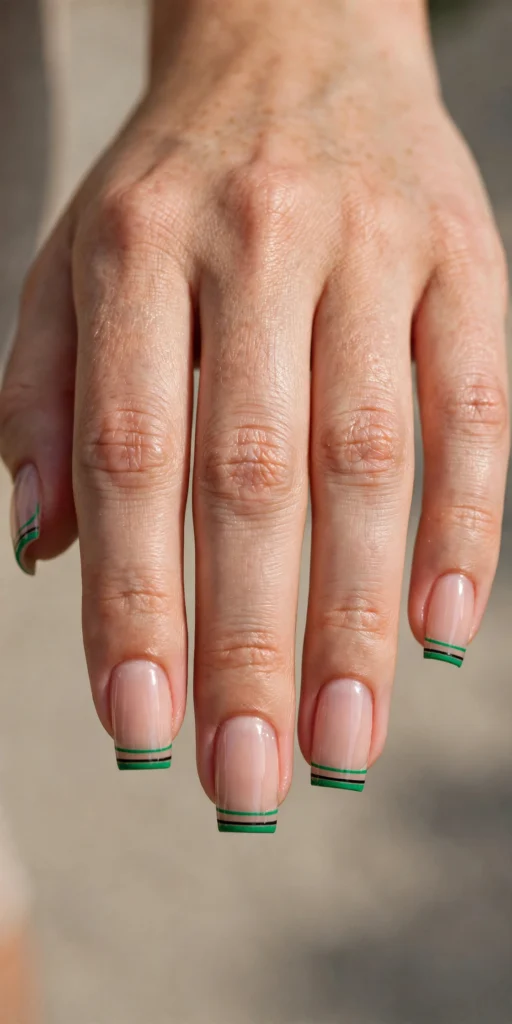
Double lines give the French manicure a graphic, tailored edge. Here, a fine emerald line runs along the free edge with a second black line just beneath it, creating a precise two-stripe frame over a sheer base. On medium square nails the geometry looks sharp and modern — part nail art, part menswear pinstripe. It is a strong choice if you love emerald but want a cooler, more architectural mood than the soft classic curve.
Striping brushes are non-negotiable for this one. Paint the emerald line first, following the edge, let it dry or cure, then add the black line beneath it at a consistent distance. Gel polish is the easier medium because uncured lines can be wiped and redrawn until they are perfect. Keep both lines the same weight, and practice on a silicone mat first — your second hand will thank you for the warm-up.
13. Emerald Jelly French Tips
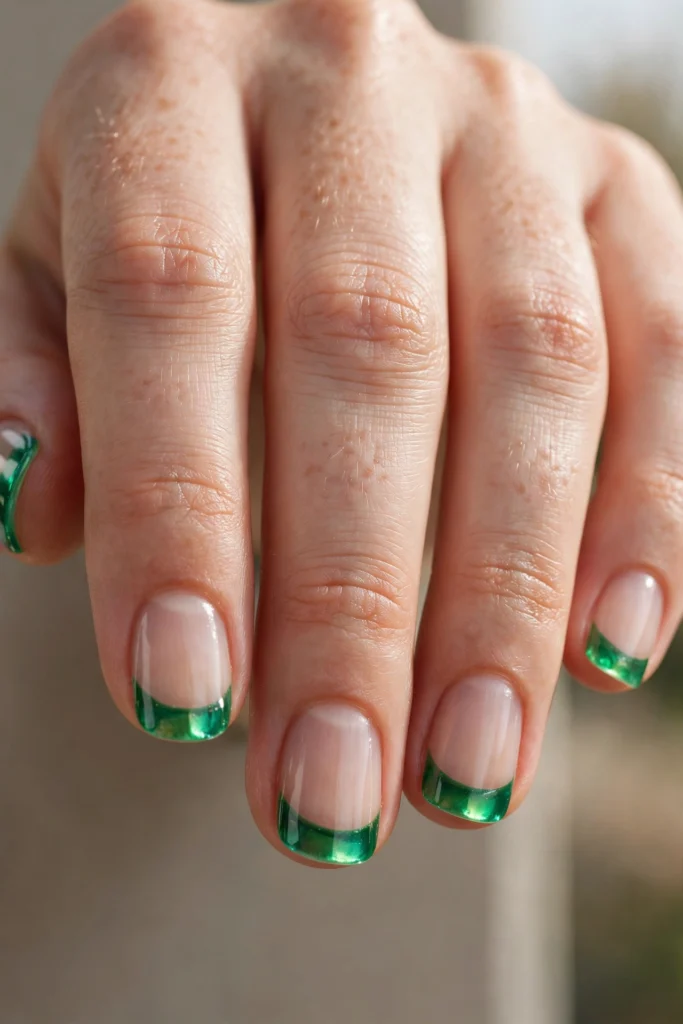
Jelly polish turns emerald into stained glass. The translucent green lets light pass through the tips, giving short natural nails a juicy, see-through glow that feels fresh and youthful rather than formal. Because the color is sheer, it is wonderfully forgiving — small imperfections in the smile line simply disappear into the translucency. Jelly emerald is the perfect summer-to-fall bridge shade and a gentle introduction to green for anyone who usually wears nudes.
Jelly formulas are designed to be built in layers, so expect two or three thin coats on the tips to reach a rich emerald while keeping the glassy transparency. A jelly-specific polish or a few drops of emerald concentrate mixed into clear gel both work. Paint your sheer base first and let it set, then float the jelly color onto the tip area with a light hand. Finish glossy — matte top coat would cancel the stained-glass effect.
14. Emerald French Fade
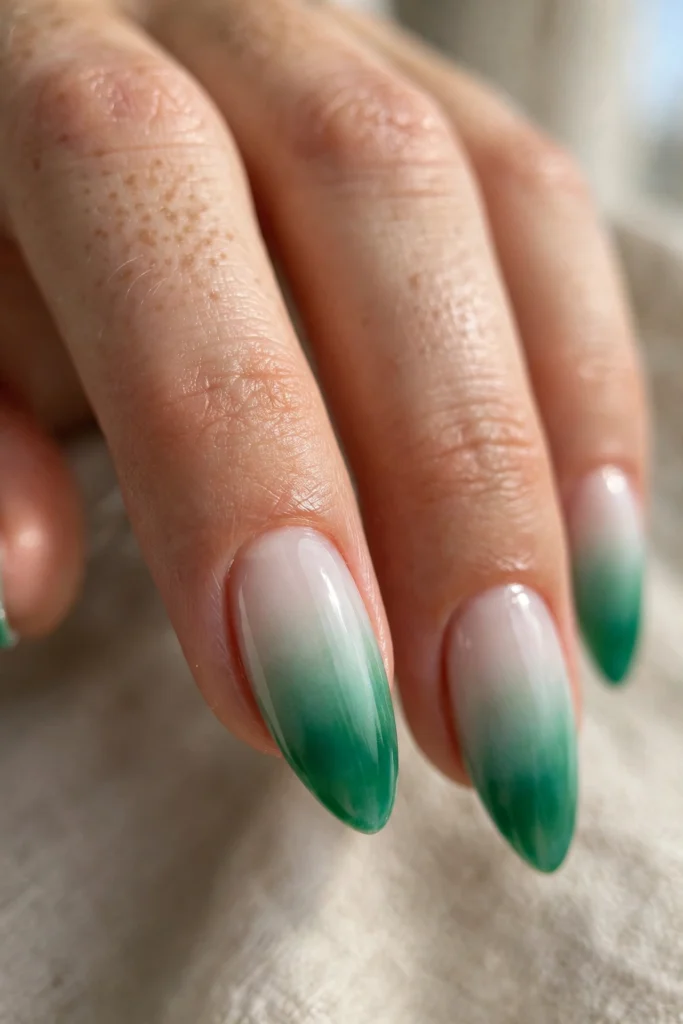
The French fade — the green cousin of baby-boomer nails — feathers emerald softly into a milky base with no visible smile line at all. The transition is gradual and blurred, so the manicure looks like the color is simply deepening toward your fingertips. It is the softest, most romantic way to wear emerald, and a gift for anyone whose smile lines never come out even: there is no line to get wrong. The almond shape flatters the gradient best.
Build the fade with a sponge or a fluffy ombre brush. Apply your milky base, then pat emerald onto the tip third of the nail, bouncing the sponge upward so the color thins as it climbs. Repeat in two or three layers, curing or drying between them, until the deepest green sits exactly at the edge. A final glossy top coat melts the layers together and makes the fade look airbrushed.
15. Emerald Stiletto French Tips
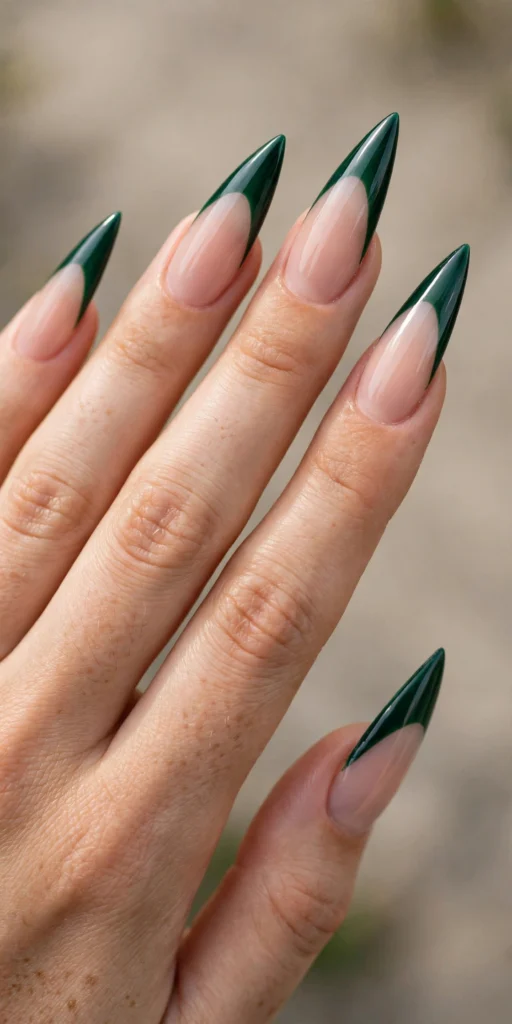
Stiletto nails are the drama queens of the nail world, and emerald is their perfect costume. The sharp pointed shape stretches the deep green tip into an elegant spike, turning the French manicure into something fierce and unmistakably glamorous. This is not an everyday-practical design — it is for events, shoots, and seasons of life when your nails are the main character. Deep emerald keeps the drama sophisticated rather than costume-like.
Length is the price of admission: stilettos work best on strong enhancements, so gel extensions or acrylics give the safest foundation at home. Paint the tips following the pointed silhouette, letting the smile line sweep up the sides to emphasize the shape. Because dark polish reveals uneven edges instantly, file and perfect the shape before any color goes on. Finish with a hard-wearing glossy top coat to protect those vulnerable points.
16. Short Square Emerald French Tips
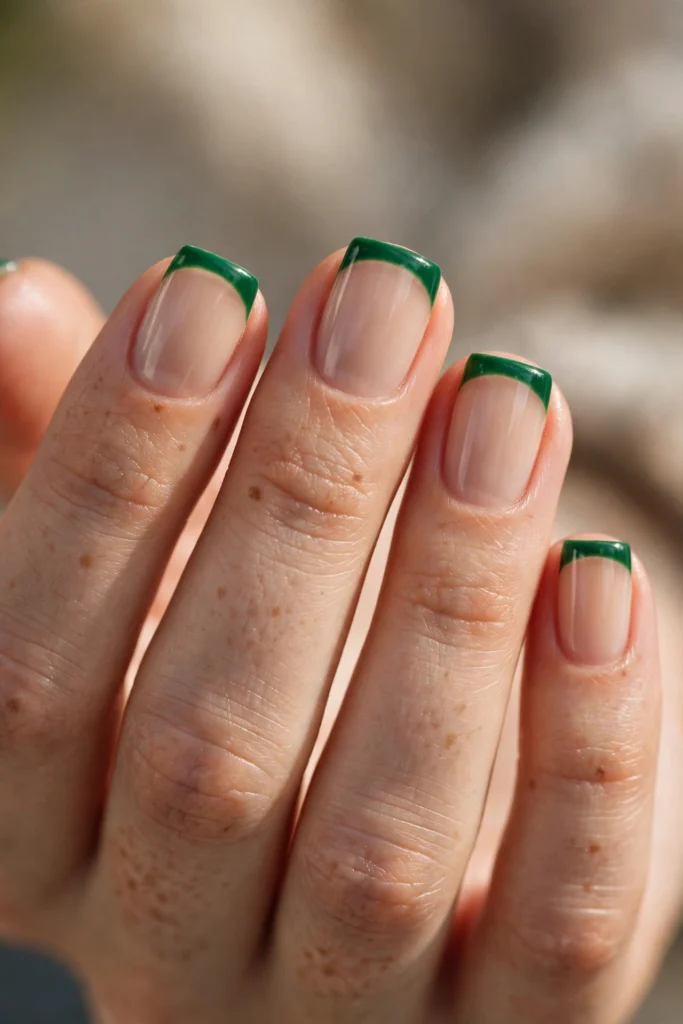
Short square nails are the workhorses of the manicure world — practical for typing, texting, and real life — and emerald tips make them look anything but plain. The crisp straight edge of the shape pairs beautifully with the straight-across French band, and the jewel tone turns a sensible manicure into a style statement. If you keep your nails short for work or preference, this is the emerald design that will get the most wear in your life.
Keep the tip band proportional: on short nails, about one-fifth of the visible nail keeps the green elegant instead of overwhelming. French tip guides or striping tape help get the band straight while you are learning, and a cleanup brush fixes small wobbles. Regular polish is genuinely practical at this length because touch-ups are quick; cap the free edge carefully, since short square corners are the first place dark tips show wear.
17. Emerald French Tips with a Tortoiseshell Accent
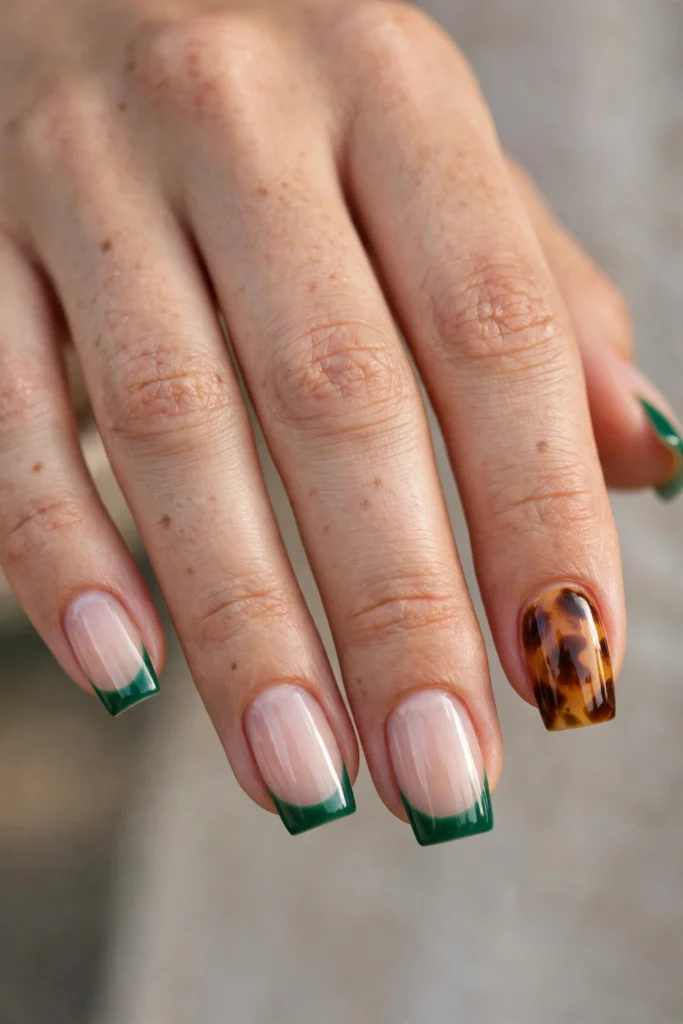
Emerald and tortoiseshell are a masterclass in warm-meets-cool styling. Most nails wear classic emerald tips, while one accent nail goes full tortoiseshell — layered amber, caramel, and dark brown blotches with that unmistakable depth of polished resin. The pairing is pure autumn luxury, echoing tortoiseshell sunglasses and gold jewelry, and it lets you try the tortoiseshell trend without committing all ten nails to it.
For the accent nail, work in translucent layers: a sheer amber base, then irregular darker blotches dabbed on with a small brush, letting each layer stay slightly transparent so the pattern gains depth. Keep your emerald tips classic and glossy so the pairing reads intentional. Gel is the easier medium for tortoiseshell because you can cure each layer before adding the next, stopping the colors from muddying into each other.
18. Wavy Emerald Chrome French Tips
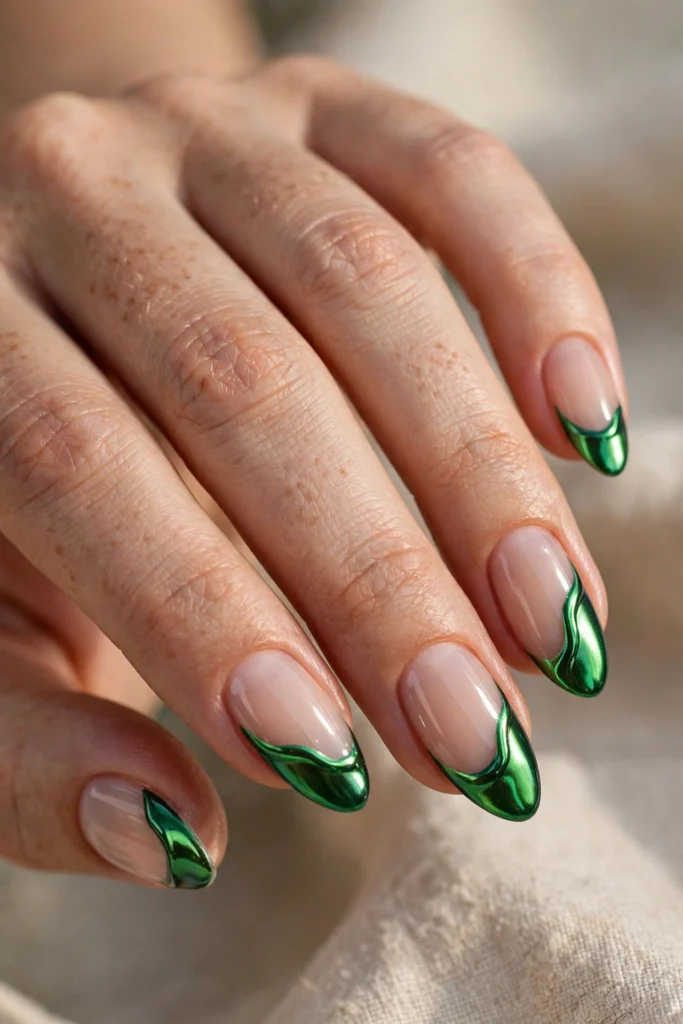
This design breaks the French rulebook on purpose: instead of a neat curved smile line, a fluid, wavy ribbon of mirror-chrome emerald wanders across each tip. The organic line feels artistic and alive, and the chrome finish reflects light like liquid metal as your hands move. On a sheer nude base the contrast between the natural nail and the molten green edge is striking — a manicure for someone who loves emerald but finds the classic French too predictable.
Chrome powder is the key product. Paint your emerald tips and cure them to a tack-free finish, then rub chrome powder over the tip area with an eyeshadow applicator, burnishing until it shines like metal. Painting the wavy line freehand with chrome-effect gel paint also works and gives you more control over the wave. Seal with a glossy top coat made for chrome, floating it on without dragging, or the mirror finish can wrinkle and dull.
19. Emerald French Tips with a Floral Accent
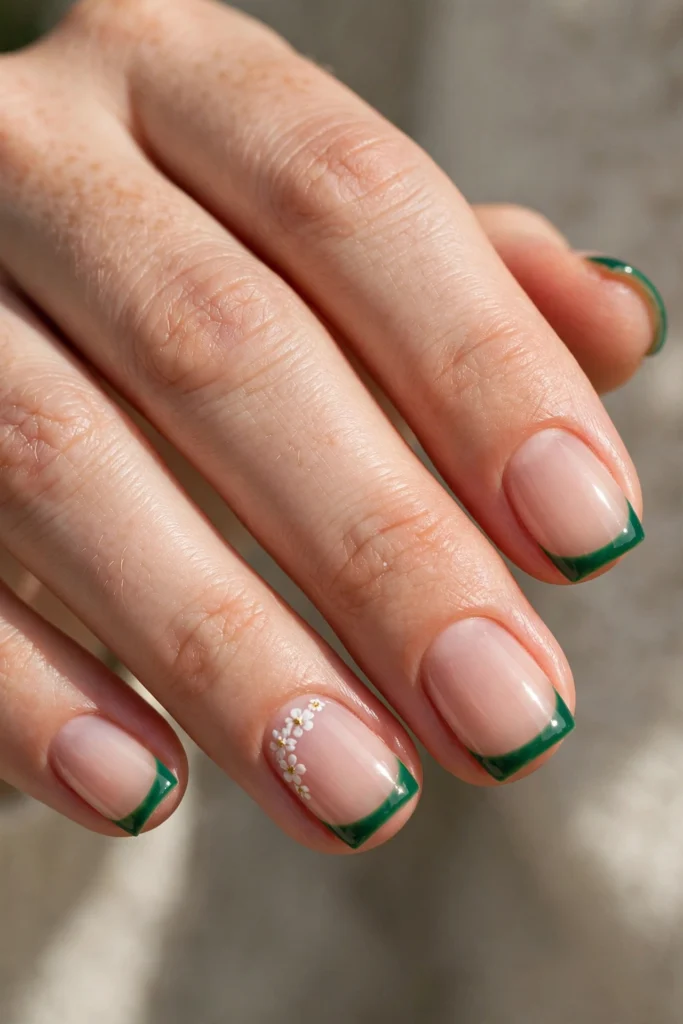
Tiny white flowers soften emerald's richness into something fresh and garden-party pretty. The tips stay classic deep green, while one accent nail carries a few delicate five-petal blooms with gold centers near the cuticle. On short square nails the combination feels cheerful and wearable — a lovely choice for spring events, brunches, and anyone who finds solid jewel tones a touch serious on their own. The flowers take two minutes and change the whole personality of the set.
Paint your emerald tips first and let them set completely. For each flower, use a dotting tool to place five small white dots in a circle, then add a tiny gold dot in the center. That is genuinely all there is to it — the dots form petals on their own. Keep the blooms small and limited to one or two accent nails so the design stays elegant, and seal everything with a glossy top coat once the dots are dry.
20. Reverse Emerald French Tips
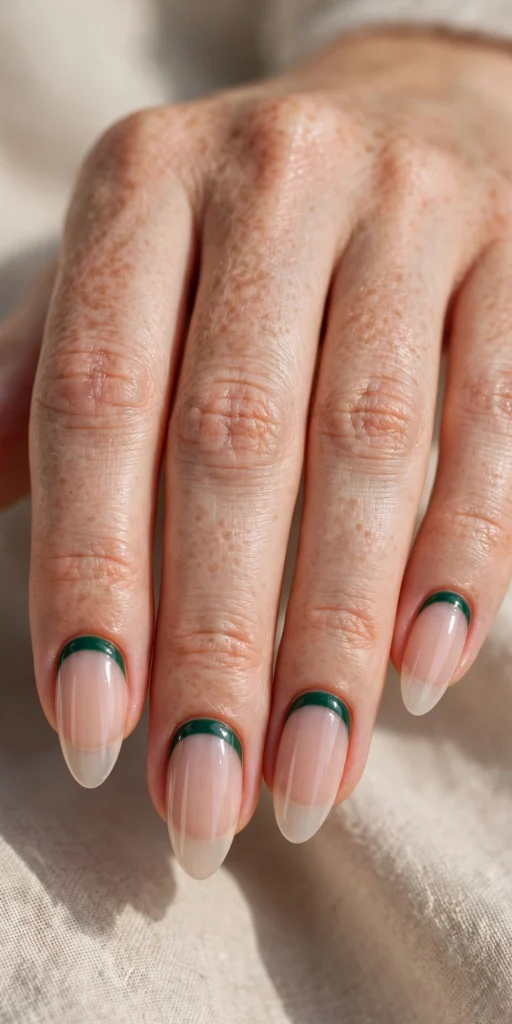
The reverse French flips the manicure upside down: the emerald band hugs the cuticle in a deep green crescent, while the rest of the nail stays glossy, sheer, and bare-looking. It is unexpected, modern, and surprisingly practical — because the color sits at the base, new growth blends in almost invisibly, so the design looks fresh for far longer than a traditional tip. On almond nails the crescent follows the cuticle curve like a little emerald moon.
Work carefully near the cuticle, since that skin is sensitive and flooding it causes lifting. Use a small, flat brush to place the emerald crescent, keeping a hair-width gap from the skin, and clean up immediately with a pointed cotton swab if the color strays. Gel is forgiving here because you can perfect the crescent before curing. Keep the sheer part of the nail in a glossy, healthy-looking nude so the contrast stays crisp.
How to Choose the Best Products for Emerald French Tips
Emerald is a demanding color in one specific way: its deep pigment is unforgiving of a bumpy base or a wobbly smile line, because every flaw silhouettes against the dark tips. That makes product choice matter more than it does for pale manicures. Start with a ridge-filling base coat — a smooth canvas is the difference between emerald tips that look expensive and emerald tips that look homemade. A good base coat also protects your natural nails, because green and blue pigments are among the most likely to leave temporary staining behind.
For the emerald itself, look for strong pigmentation that reaches full depth in one to two coats; shades described as emerald, jewel green, or deep jade sit in the right family, while yellow-leaning greens will read grassy rather than luxurious. Decide between regular polish and gel based on your lifestyle: gel delivers two to three weeks of wear and the crispest lines for techniques like chrome and cat-eye, while regular polish is quicker to change and kinder to a tight schedule. Either way, invest in a fine French tip or liner brush — the brush in the bottle is too wide for clean smile lines on most nails. You will find a fuller breakdown in our guide to nail products for French tips.
Essential and Optional French Manicure Products
| Product or tool | Main purpose | Best for | Essential or optional |
|---|---|---|---|
| Ridge-filling base coat | Smooths the nail surface and prevents staining | Flawless dark tips | Essential |
| Sheer nude/pink polish or gel | Natural-looking base | Classic French foundation | Essential |
| Emerald polish or gel (jewel green) | Tip color | The signature color | Essential |
| High-gloss top coat | Shine and protection | Glassy, long-lasting finish | Essential |
| Fine French tip brush or liner brush | Crisp smile lines | Precise tip painting | Essential |
| Matte top coat | Velvety matte designs | Matte emerald looks | Optional |
| Magnetic cat-eye gel + magnet | Velvet shimmer texture | Cat-eye emerald tips | Optional |
| Chrome powder + applicator | Mirror finish | Emerald chrome tips | Optional |
| Gold foil or gold gel paint | Metallic accents | Foil and micro-line designs | Optional |
| Dotting tools | Dots and flower petals | Floral accent designs | Optional |
| Rhinestones + wax pencil | Crystal accents | Statement accent nails | Optional |
| Makeup sponges | Ombre and fade gradients | Ombre, fade, and glitter designs | Optional |
| Cuticle oil | Healthy cuticles | Finishing every manicure | Essential |
| French tip guides/stickers | Clean edges for beginners | Learning smile lines | Optional |
Beginner French Manicure Kits Versus Individual Products
If you are painting French tips for the first time, a beginner kit is genuinely tempting: it bundles a base shade, a tip color, guides, and a top coat in one box, usually for less than the same products bought separately. Kits remove the guesswork of matching a base to your skin tone, and the included guides help your first smile lines come out clean. The trade-off is range — most kits offer classic white or pink tips, so for emerald you will typically need to add a jewel-green polish of your own, and the kit's brush quality is rarely as good as a standalone French brush.
Buying individual products costs more upfront but pays off across many manicures. You choose an emerald with the exact depth you want, a base coat that suits your nails, and specialty items — magnetic gel, chrome powder, gold foil — only for the designs you actually plan to wear. For emerald specifically, individual buying is usually the smarter route, because the shade is the whole point of the manicure and kit greens tend to run bright rather than jewel-toned.
| Option | Typical contents | Pros | Cons | Best for |
|---|---|---|---|---|
| Beginner kit | Base, white/pink tips, guides, top coat | Affordable, simple, guided | No true emerald shade, basic brush | First-ever French manicure |
| Individual products | Your chosen base, emerald, tools, top coat | Exact shade, better tools, reusable | Higher starting cost | Emerald and specialty finishes |
| Hybrid approach | Kit for basics + standalone emerald polish | Guided start, correct color | Two purchases | Beginners set on emerald |
Regular Nail Polish Versus Gel Polish
Regular polish is the flexible friend: it applies without equipment, removes in minutes with ordinary remover, and lets you change your emerald design every week if you like. Modern formulas give four to seven days of good wear on French tips, especially if you cap the edges and refresh the top coat midweek. Its weakness is patience — each layer must dry before the next, and a rushed smile line smudges rather than wipes clean.
Gel polish is the commitment that pays in durability. Cured under a lamp, it sets hard instantly, holds crisp lines for chrome, cat-eye, and foil techniques that layer uncured product, and wears two to three weeks with barely a chip. The costs are real too: a lamp and compatible products to buy, longer removal that requires soaking, and more care needed to keep uncured gel off your skin. For emerald — a color most people wear for an occasion or a season — gel's longevity usually wins, but classic, micro, and matte emerald designs all work beautifully in regular polish.
| Factor | Regular polish | Gel polish |
|---|---|---|
| Typical wear | 4–7 days | 2–3 weeks |
| Equipment needed | None beyond polish | LED/UV lamp |
| Application forgiveness | Smudges if rushed | Wipe and redo before curing |
| Best emerald techniques | Classic, micro, matte, floral | Chrome, cat-eye, foil, marble |
| Removal | Minutes with remover | 10–15 minute soak-off |
| Cost per manicure | Lower | Higher upfront, lower over time |
French Tip Stickers Versus Nail Art Liner Brushes
French tip stickers and guides stick to the nail and mask off everything except the tip, so you paint over the edge and peel to reveal a clean line. For a beginner's first emerald manicure they are close to foolproof, and they are ideal for short square bands that need to be perfectly straight. Their limits show on curved almond smiles and specialty shapes — stickers cannot make a V-cut, a wave, or a micro line, and they occasionally let dark polish bleed underneath if not pressed down firmly.
A liner brush asks more of you and gives more back. With a fine brush you control the depth, curve, and style of every tip — classic curves, double lines, reverse crescents, wavy chrome edges — and cleanup takes seconds with a flat brush and remover. The learning curve is honest: expect your first two or three attempts to wobble. Our step-by-step guide to how to do French tip nails at home walks through brush technique in detail. A sensible path is stickers for your first set, then a liner brush once emerald French becomes a habit.
| Factor | Tip stickers/guides | Liner brush |
|---|---|---|
| Skill needed | Minimal | Moderate, improves with practice |
| Line quality | Clean, uniform | As good as your hand |
| Design freedom | Classic bands only | Any shape: V-cut, wave, micro, reverse |
| Speed | Fast per nail | Slower at first, faster with practice |
| Cost | Cheap, disposable | One brush lasts many manicures |
| Best for | Beginners, straight square tips | Almond curves and specialty designs |
How to Create French Tip Nails at Home Step by Step
- Shape and prep. File your nails to your chosen shape, gently push back cuticles, and lightly buff the surface so it is smooth and matte. Wash your hands and dehydrate the nail plate with a swipe of remover or alcohol.
- Apply base coat. Lay down a ridge-filling base coat on every nail and let it dry or cure fully. This layer protects against emerald staining and gives the color a smooth canvas.
- Paint the sheer base. Apply one or two coats of sheer nude or blush polish over the whole nail for that clean French foundation. Keep the coats thin and even.
- Mark your smile lines. If you are using guides, press them firmly onto each nail now. If freehanding, rest both elbows on the table and plan to rotate each finger as you paint.
- Paint the emerald tips. With your French or liner brush, paint the emerald in two thin coats, following the natural curve of the free edge. Thin coats are the secret — one thick coat pools, streaks, and drags.
- Clean up the edges. Dip a flat cleanup brush in remover (or use a corrector pen) and trace along the smile line and sidewalls to sharpen every curve before the color fully sets.
- Add your design details. This is the moment for gold lines, foil, marble veining, magnetic cat-eye effects, chrome powder, dots, or a rhinestone — whichever design from the list above you chose.
- Seal and nourish. Float a glossy (or matte) top coat over everything, capping the free edge to lock the tips in. Once set, massage cuticle oil around each nail for that salon-finished look.
How to Make Your Emerald French Manicure Last Longer
Longevity is mostly decided before the color goes on. Thorough prep — clean, dry, lightly buffed nails with cuticles pushed back — gives polish something to grip, and capping the free edge with every layer, including the top coat, seals the exact spot where dark tips chip first. Thin coats outlast thick ones, because thick layers of pigmented polish stay soft underneath and peel. If you chose gel, keep it off the skin and cuticle; flooded edges lift, and lifted edges invite peeling within days.
Aftercare is simple but not optional. Wear gloves for washing dishes and cleaning, since hot water and detergents are the fastest way to dull and lift any manicure. Refresh your glossy top coat every two to three days to restore the protective layer as it wears. Keep cuticle oil in your daily routine — hydrated nails flex instead of snapping, and flexible nails hold polish longer. More habits worth stealing are in our guide to keeping French tip nails fresh and healthy.
Common Mistakes to Avoid When Creating French Tips
Skipping base coat. Emerald and green pigments can leave a temporary yellow-green stain on natural nails. A quality base coat is the barrier that prevents it — never let emerald touch a bare nail.
Painting one thick tip coat. It feels faster, but thick dark polish streaks, bubbles, and stays soft underneath. Two thin coats always look deeper and last longer.
Choosing a grassy green. Emerald should be deep, blue-leaning, and jewel-like. A bright yellow-green reads playful rather than luxurious — check the shade in daylight before committing to ten nails.
Flooding the cuticle with the reverse design. Color pooled against skin lifts quickly and can irritate. Keep a hair-width gap and clean up immediately.
Over-blending marble and ombre. The charm of malachite veining and soft fades is visible structure. Blend edges only; if everything becomes one uniform blur, you have erased the design.
Coating rhinestones with top coat. It turns sparkling crystals cloudy in seconds. Trace top coat around stones, never over them.
Rushing the dry time with regular polish. Dark tips smudge into the base if you layer too soon. Thin coats plus honest drying time beat any quick-fix trick.
How Much Does an At-Home French Manicure Cost?
The honest answer is that the first emerald manicure costs the most and every one after it is cheap. If you already own basics like a base and top coat, adding a quality emerald polish and a fine French brush is a small purchase, and that single bottle covers many full sets of tips — French designs use very little colored product compared with full-coverage color. Building a gel setup from zero costs more because of the lamp, but the per-manicure cost then drops below regular polish, since cured products last for years of occasional use.
Specialty finishes add modest extras: chrome powder, magnetic cat-eye gel, gold foil, and rhinestones are all inexpensive, multi-use supplies rather than single-manicure purchases. Compared with salon pricing for a French manicure with nail art — which in many US cities runs well above the cost of a bottle of polish for a single visit — the at-home route pays for itself within two or three manicures, and the supplies keep working for every color story after emerald.
| Item | Typical US price range | One-time or per-manicure |
|---|---|---|
| Emerald polish or gel polish | $8–$18 | One-time (many manicures per bottle) |
| Base coat + top coat | $8–$15 each | One-time |
| Fine French/liner brush | $5–$12 | One-time |
| French tip guides | $4–$8 per pack | Occasional |
| LED lamp (gel only) | $25–$60 | One-time |
| Specialty extras (chrome, foil, cat-eye gel, stones) | $5–$15 each | One-time |
| Remover, files, cuticle oil | $5–$12 | Occasional |
| Estimated cost per at-home manicure (after setup) | About $1–$3 in consumables | Per manicure |
Frequently Asked Questions
Are emerald green French tip nails in style for 2026?
Yes — jewel tones are a defining nail story for 2026, and emerald is the standout shade, especially through fall, winter, and the holiday season. The French format keeps it classic while the color feels current, and finish trends like velvet cat-eye, chrome, and gold detailing layer neatly on top. Emerald also works outside the cold months as a rich alternative to neutral manicures.
What skin tones does emerald green suit?
Emerald is one of the most universally flattering colors because its blue-leaning depth complements both warm and cool undertones. It looks especially striking against deep skin tones, glows on olive and medium skin, and gives fair skin an elegant, porcelain contrast. If a bottle shade looks too bright or yellow-green against your hand, choose a deeper, bluer emerald instead.
What is the difference between emerald green and regular green French tips?
Emerald is a specific deep, jewel-toned green with a hint of blue, inspired by the gemstone. "Green" French tips can mean anything from pastel mint to neon lime to forest green. Emerald sits at the luxurious end of the family — saturated and rich rather than bright — which is why it pairs so naturally with gold accents and evening styling.
Do emerald French tips work on short nails?
Absolutely, and they are one of the best dark colors for short nails because the French format leaves most of the nail sheer. Keep the tip band thin — around one-fifth of the nail — so the green does not overwhelm a small nail bed. The micro tips (#7), jelly tips (#13), short square design (#16), and floral accent (#19) in this roundup were chosen with short nails in mind. Our short French tip nail designs guide has more length-friendly ideas.
What colors pair best with emerald French tips?
Gold is the classic partner — foil, chrome lines, and micro outlines all lift emerald into luxury territory. Black adds graphic contrast for double-line designs, white and cream soften it for floral and marble looks, and nude or blush bases keep every version wearable. For an outfit-level pairing, emerald tips sit beautifully with cream, camel, black, and burgundy clothing.
How long do emerald French tips last?
With regular polish, expect four to seven days before tip wear begins to show; deep colors reveal chips sooner than nudes. Gel versions typically last two to three weeks. Capping the free edge, wearing gloves for wet work, and refreshing the top coat every few days noticeably extend either finish — the reverse design (#20) lasts longest of all, because grow-out hides at the base.
Will emerald polish stain my natural nails?
It can, temporarily — green and blue pigments are known stainers. A proper base coat is reliable protection, so never apply emerald to a bare nail. If you do notice a faint tint after removal, it is on the surface layer and fades as the nail grows; a gentle buff or a soak in warm soapy water usually lifts most of it.
Can I do emerald French tips without gel?
Yes. The classic, micro, matte, floral, jelly, and double-line designs in this list all work with regular polish. Gel mainly helps with techniques that need curing between layers — chrome powder, magnetic cat-eye, marble veining, and foil placement. If you use regular polish, work in thin coats and let the emerald dry fully before adding details or top coat.
What nail shape is best for emerald French tips?
Almond is the most universally flattering — it elongates the fingers and lets the deep tips look elegant rather than heavy, which is why so many designs here use it; our almond French tip nail designs guide goes deeper on the shape. Square and coffin shapes give a bolder, more modern result, short square keeps emerald practical for everyday, and stiletto is reserved for full drama.
Are emerald French tips appropriate for weddings and formal events?
Very much so. Emerald reads as a jewel, so it suits formal settings the way a gemstone accessory does. For weddings, keep the design refined — classic tips, the gold chrome outline (#2), the pearl finish (#10), or a single rhinestone accent (#11) all photograph beautifully and complement both guest dresses and bridal parties wearing deep green or gold.
Conclusion
Emerald green French tip nails prove that one jewel tone can hold an entire manicure wardrobe — from the clean confidence of classic tips to the moving shimmer of velvet cat-eye, the molten flash of wavy chrome, and the quiet practicality of a reverse crescent that hides grow-out. Whether your nails are short and square or long and pointed, there is an emerald design here that fits your shape, your skill level, and your season.
If emerald has you in a jewel-tone mood, keep exploring the color collection: black French tip nails offer the darkest, edgiest tips, blue French tip nails bring emerald's cooler jewel cousins, and brown French tip nails are the warm neutral that pairs with everything. Browse the full French Tip Nails by Color collection for every shade in the series, and save this page for the next time your manicure needs a little gemstone energy. Happy painting!


Pingback: 20 St. Patrick's Day French Tip Nails in Green and Gold