Introduction
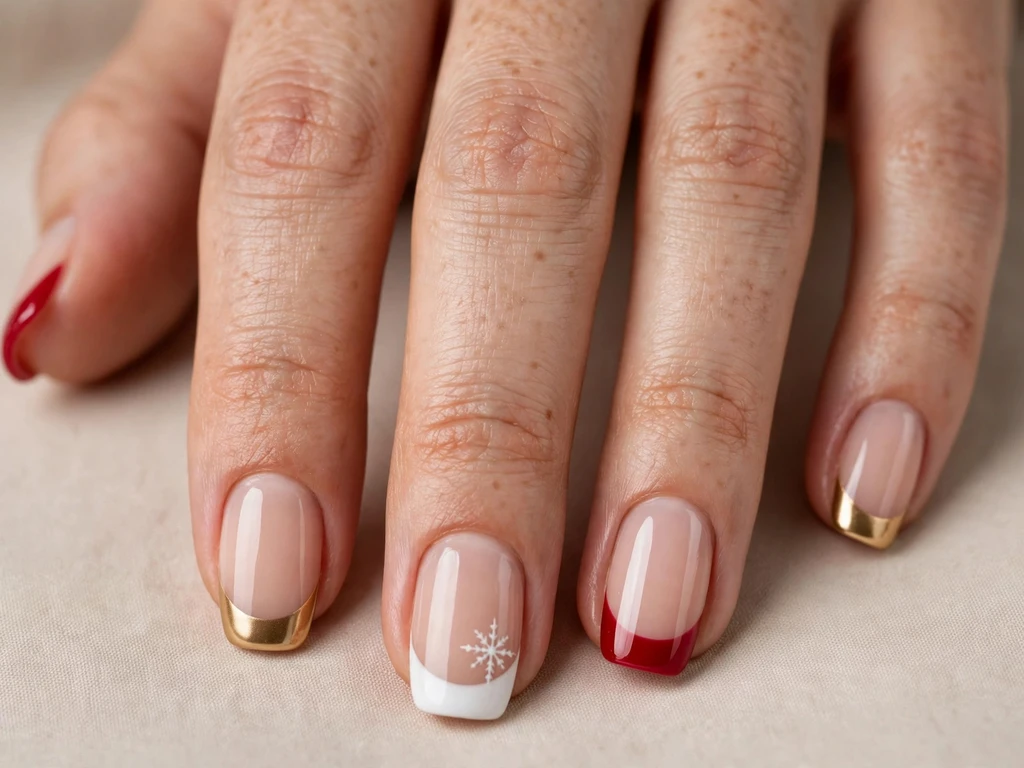
Christmas French tip nails are the easiest way to look festive without giving up a clean, elegant manicure. Instead of covering every nail in heavy holiday art, a French tip keeps the classic smile line and adds Christmas colour, sparkle or a small seasonal detail only where it looks best. That balance is why this style works for a family dinner, a work party, Christmas Eve and even a full week of celebrations.
This guide brings together 25 genuinely different Christmas French tip designs, not the same idea repeated in a new colour. You will find classic red and gold tips, quiet designs for work, playful candy cane and gingerbread ideas, frosty winter looks, and elegant options for short nails. Each design explains the shape and length it suits best, the finish to ask for, and a simple way to recreate or adapt it at home or in the salon.
If you are new to French tips, start with a design that uses one accent nail or one colour change. If you already love bold nail art, the plaid, ornament and sweater designs below give you more detail without losing the French tip shape. Use the “How to choose” section first, then pick the design that fits your hands, your plans and how long you want the manicure to last.
How to choose your Christmas French tip design
Start with your plans, not just a photo
A design that looks beautiful in a close-up photo can feel impractical for a week of cooking, wrapping gifts and typing. For everyday December wear, choose a thinner tip, a nude or milky base, and sparkle only on the tip or on one accent nail. For a single party night, a deeper tip, foil, glitter or a detailed accent nail is a better choice because it does not need to survive a full week.
Match the tip width to your nail length
Short nails look neatest with a thin or medium tip, because a very deep tip can make the nail bed look smaller. Medium nails can carry most designs in this guide. Long almond or coffin nails suit deeper tips, plaid tips and layered details, because there is more space for the pattern to stay clear. If your nails are very short, look first at designs 2, 6, 18 and 25, which were written with short nails in mind.
Choose one hero detail
The most wearable Christmas French tips have one hero detail: the snowflake, the plaid, the candy cane stripe, the gold line or the ornament. When every nail has a different hero detail, the manicure can look busy and the French tip shape disappears. A good rule is to put the detailed art on one or two accent nails and keep the other nails in a matching tip colour.
Pick a base that flatters your skin tone
A sheer pink base warms most skin tones and keeps a red or gold tip looking soft. A milky white base brightens the design and works well for snowflake, silver and icy blue looks. A nude base that is close to your natural nail colour makes a bold tip, such as burgundy or navy, look more polished and less harsh. If you are unsure, ask your nail technician to test one nail in daylight before painting the full set.
Think about finish and wear time
A glossy top coat makes red, gold and glitter tips look richer and helps protect the art. A matte finish softens velvet red and sweater designs, but it can show marks more easily, so it suits a short event rather than a two-week manicure. Glitter and foil tips hide small chips better than a flat colour tip, which is useful if you want the manicure to last from a party through to New Year.
The 25 Christmas French tip designs
1. Classic Red Tips with a Gold Smile Line
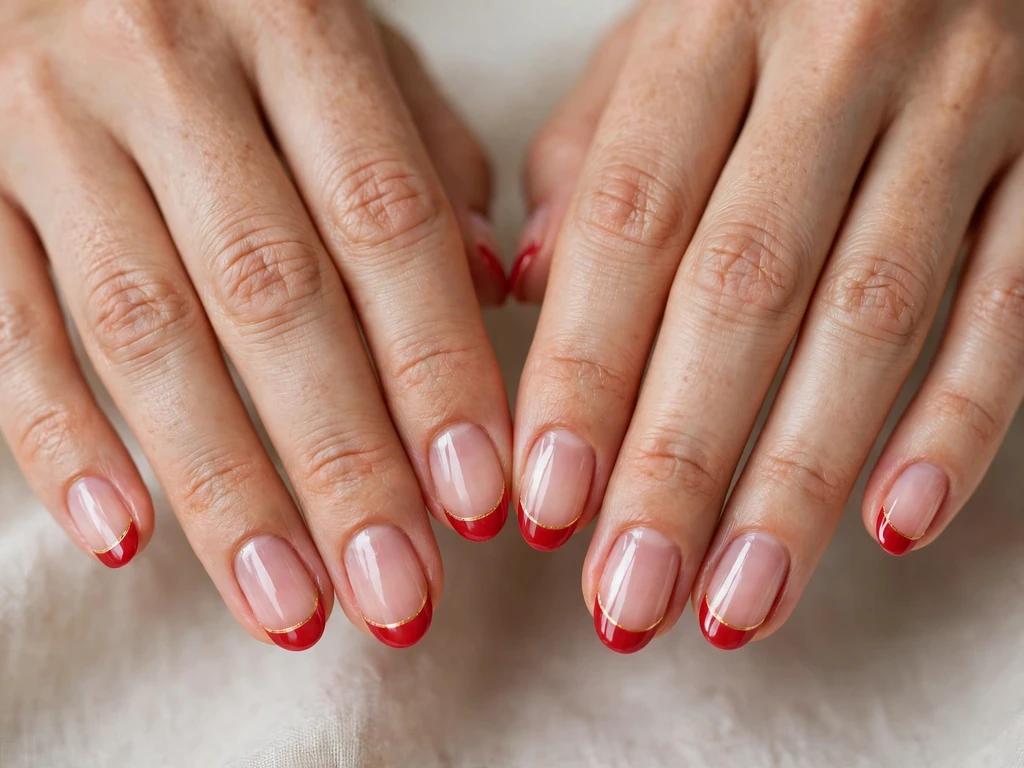
This design keeps the traditional French shape and gives it a clear Christmas identity. A sheer pink base covers the nail, while a rich, classic red tip follows the natural smile line. A very thin gold line sits exactly where the red tip meets the base, so the design reads as festive without needing any painted art. The shape is oval, which softens the red and keeps the look elegant rather than harsh. The length is medium, giving the red tip enough space to look even on every finger. The finish is glossy, which deepens the red and makes the gold line catch the light. This style suits a Christmas dinner, a family gathering and a work party where you want colour without a busy pattern. Pair it with gold jewellery and a simple red or black outfit. To recreate it, paint the base first, let it dry fully, then paint the red tip in two thin coats. Add the gold line last with a fine striping brush, and seal everything with a glossy top coat.
2. Snowflake Tips on a Milky White Base
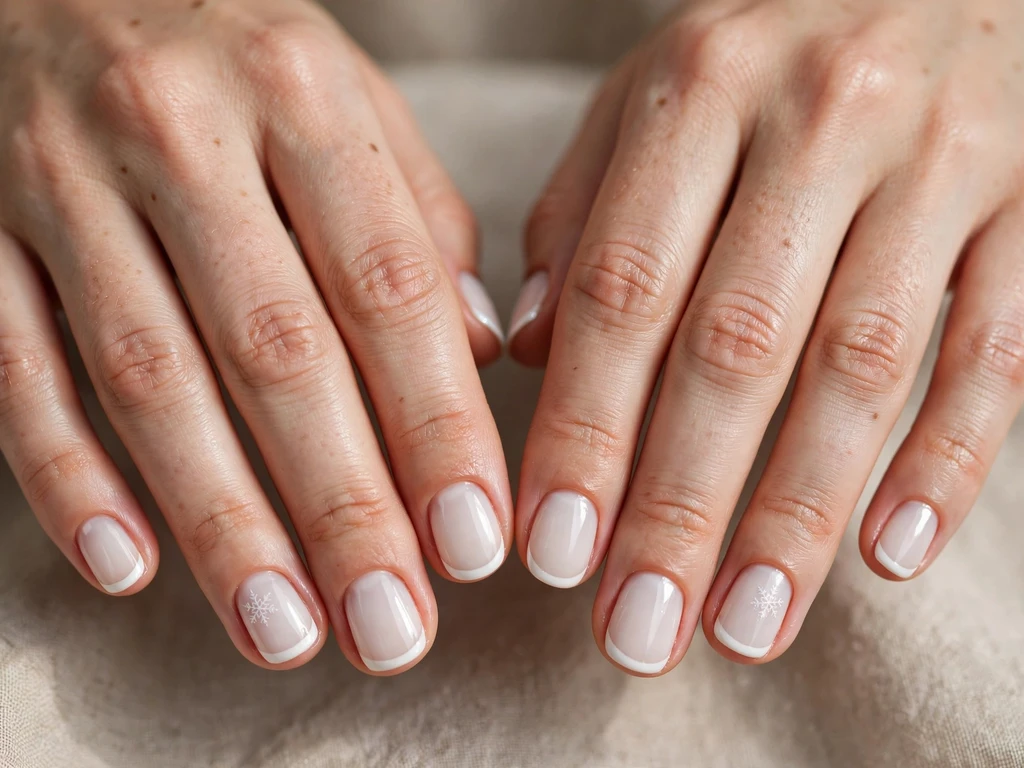
This design is quiet, wintry and easy to wear for the whole Christmas week. A milky white base softens the nail, while the French tip is a clean white band with one small, delicate snowflake painted near the tip on each accent nail. The other nails keep the plain white tip, so the snowflake detail stays special instead of overwhelming the manicure. The shape is short and rounded, which makes the design practical for everyday tasks. The length is short, so the tip stays neat and the snowflake remains clearly visible. The finish is glossy, giving the milky base a healthy, polished glow. This style suits work, school runs, family visits and anyone who wants Christmas spirit without bright colour. It pairs well with silver jewellery, cream knitwear and pale winter coats. To recreate it, use a dotting tool or a tiny snowflake sticker for the accent nail, then add a thin white line to suggest falling snow if you want extra detail.
3. Christmas Tree Accent on a Nude Base
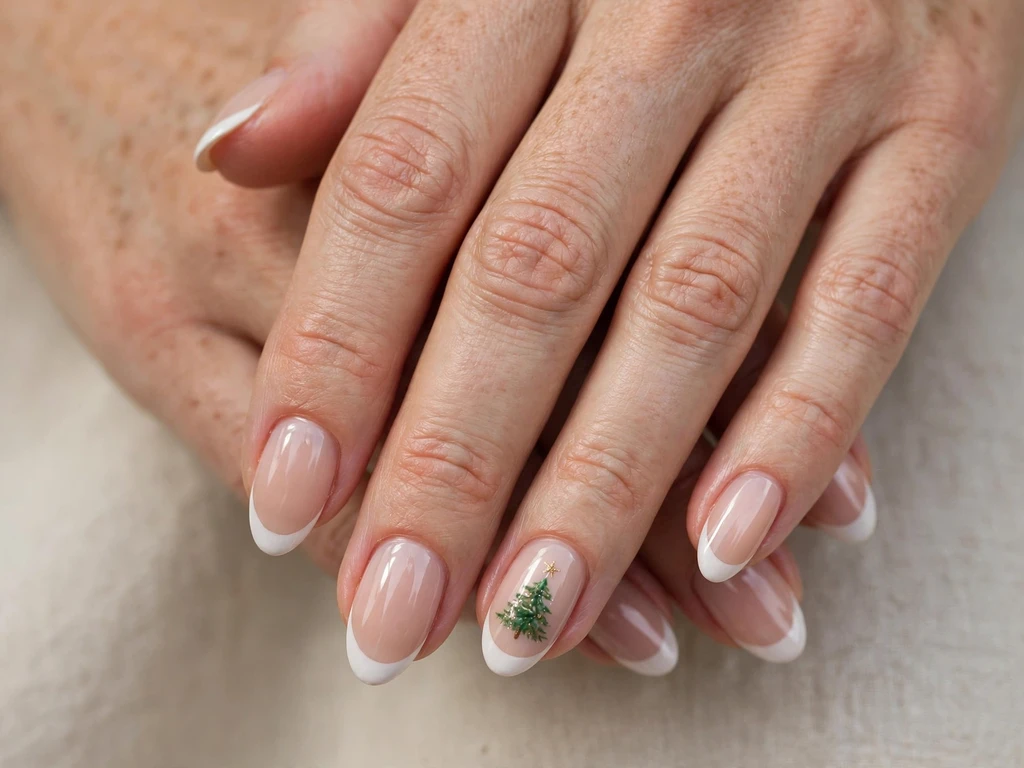
This design turns one nail into a tiny Christmas tree while keeping the rest of the manicure calm and wearable. A nude base matches the natural nail colour, and a classic white French tip appears on most nails. On the ring finger, a small green tree is painted above the tip, with a tiny gold star at the top and a few gold dots as ornaments. The shape is almond, which gives the tree accent enough length to look balanced. The length is medium, so the tree does not crowd the nail bed. The finish is glossy, which keeps the green and gold looking fresh. This style suits Christmas Eve, a festive lunch and anyone who wants one playful detail rather than a full themed set. It pairs well with green, gold or cream clothing. To recreate it, paint the tree in three short horizontal layers, narrowing towards the top, then add the star last. Keep the other nails simple so the tree remains the clear focus.
4. Candy Cane Striped Tips
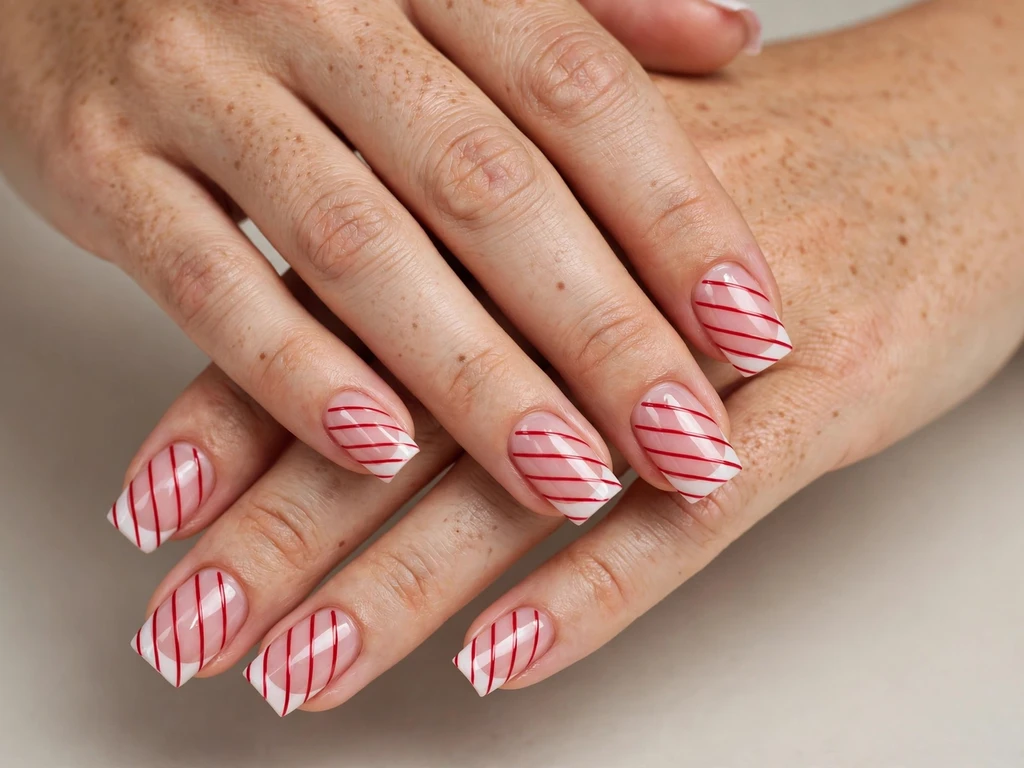
This design is playful, bright and instantly recognisable as Christmas without needing any extra art. A sheer pink base keeps the nail soft, while the French tip is painted white and then crossed with thin diagonal red stripes, like a candy cane. The stripes follow the curve of the tip, so the French shape stays clear even with the pattern. The shape is square, which gives the stripes a clean, even edge. The length is medium, because very short nails can make diagonal stripes look cramped. The finish is glossy, which makes the red and white contrast look crisp. This style suits a Christmas party, a cookie-baking day and a festive photo. It pairs well with red, white or denim outfits and simple silver jewellery. To recreate it, paint the white tip first and let it dry, then add the red stripes with a thin striping brush. Use only two or three stripes per nail, and seal with a top coat to smooth the lines.
5. Evergreen Tips with Holly Berries
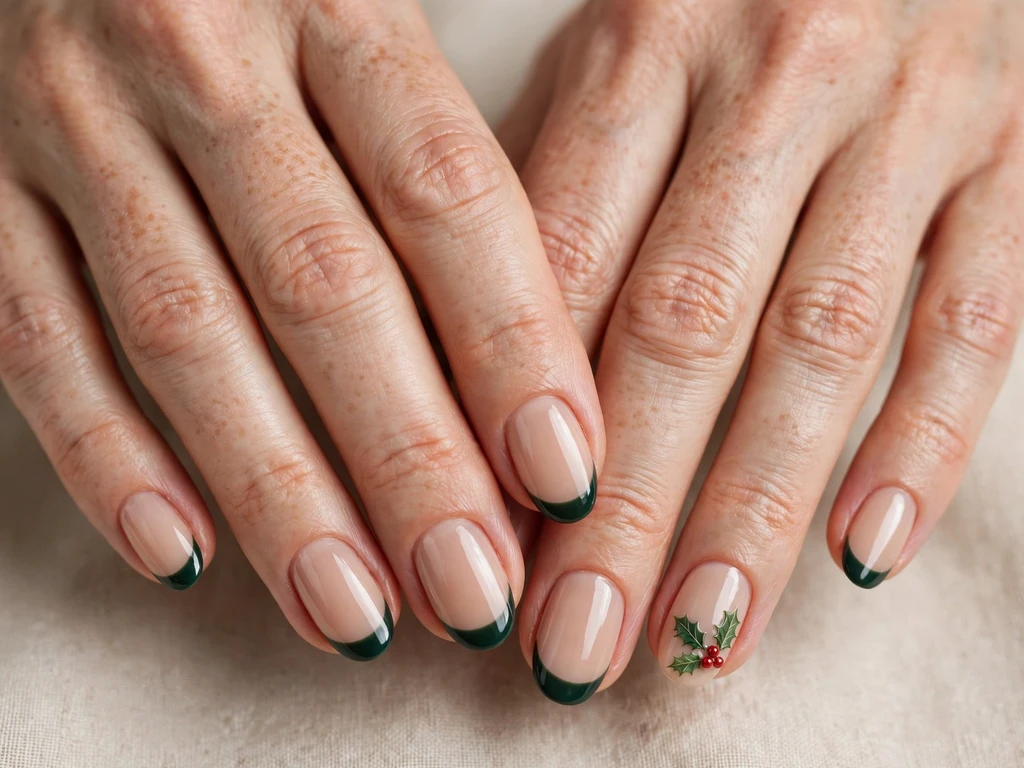
This design uses deep evergreen as the tip colour, with a small holly detail that keeps it seasonal rather than simply green. A nude base grounds the look, while the evergreen tip follows a classic French curve. On one accent nail, two small holly leaves and three tiny red berries sit just below the tip line. The shape is oval, which softens the strong green and keeps the design elegant. The length is medium, giving the holly detail enough space without crowding the nail. The finish is glossy, which makes the green look rich and the berries look polished. This style suits a Christmas dinner, a church service and a formal holiday gathering. It pairs well with dark green, black, burgundy and gold clothing. For more evergreen inspiration, see the green French tip collection at https://thefrenchtipnails.com/green-french-tip-nails/. To recreate it, paint the green tip first, then add the leaves with a small flat brush and the berries with a dotting tool. Keep the berries tiny so they read as a detail, not as a separate picture.
6. Gold Glitter Fade Tips for Short Nails
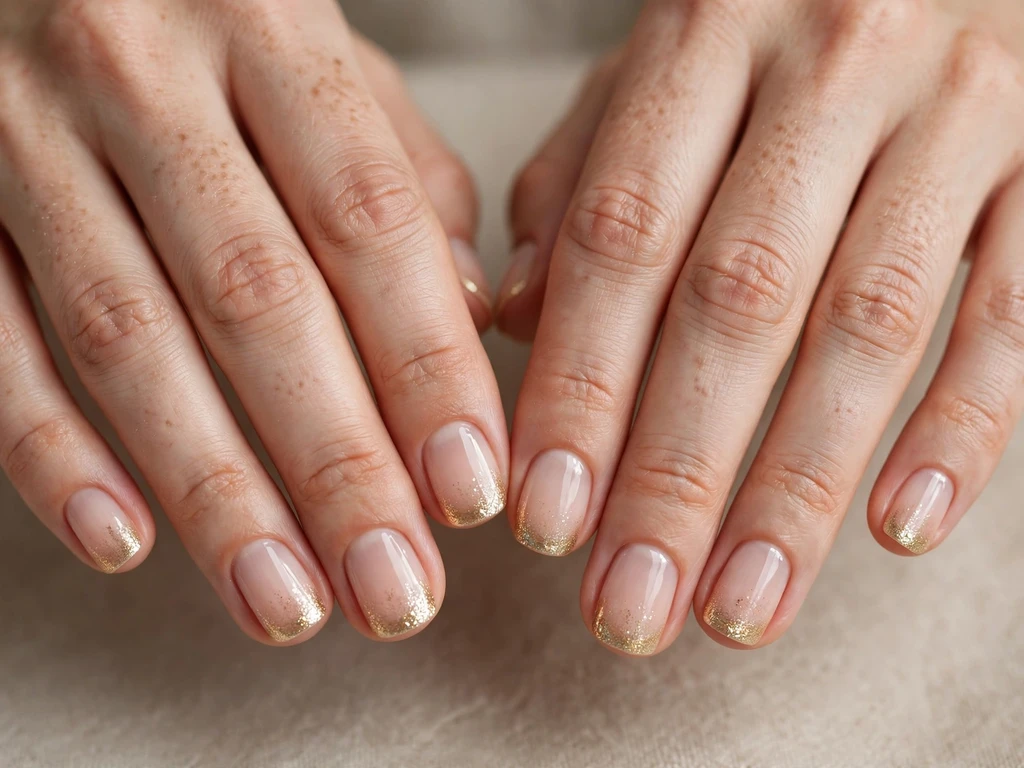
This design is made for short nails and for readers who want sparkle without a thick, heavy tip. A sheer nude base keeps the nail looking natural, while gold glitter starts softly near the smile line and becomes denser towards the tip. The fade means there is no hard edge, so even a very short tip looks intentional and polished. The shape is short and squoval, which is practical for typing, cooking and daily wear. The length is short, and the glitter fade actually helps short nails look longer because the eye follows the sparkle upwards. The finish is glossy, which locks the glitter in place and prevents a rough texture. This style suits a work party, New Year drinks and anyone who wants glamour that still feels daytime-appropriate. It pairs well with gold jewellery and neutral clothing. For more glitter tip ideas, see https://thefrenchtipnails.com/glitter-french-tip-nails/. To recreate it, sponge a small amount of gold glitter onto the tip, building it in thin layers rather than painting one thick coat. Seal with two layers of top coat for a smooth finish.
7. Silver Frost Tips with Tiny Snow Dots
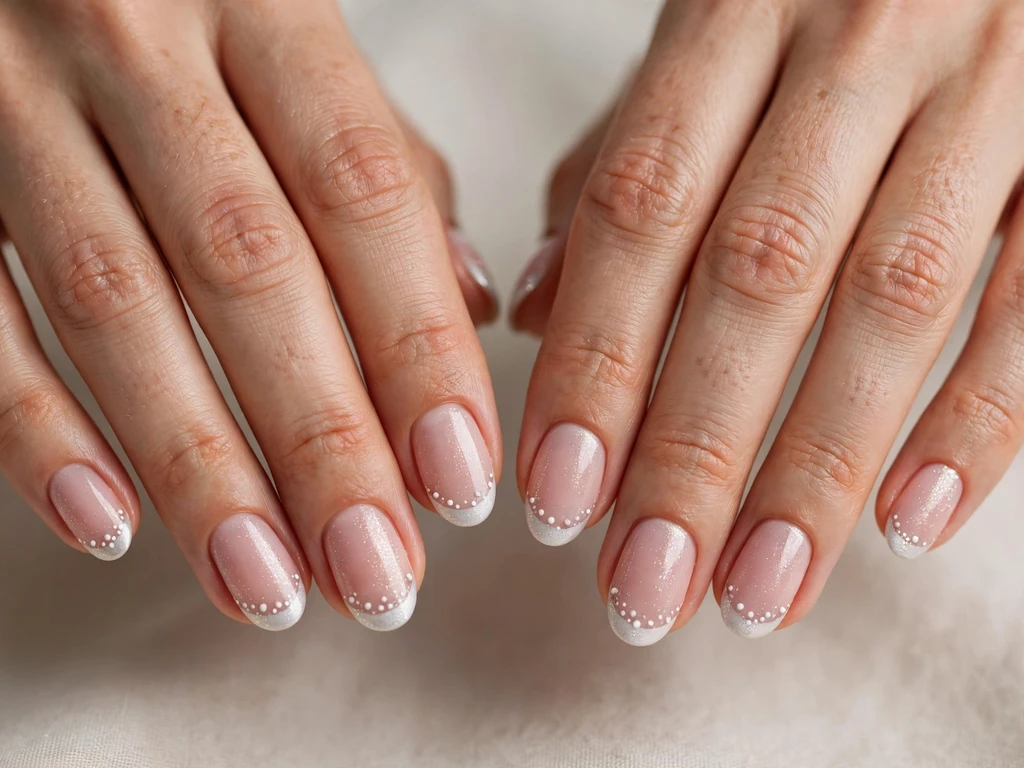
This design feels like frost on a window: cool, light and quietly festive. A pale pink base keeps the nail warm, while the French tip is a soft silver-white band. Tiny white dots are scattered just below the tip line, suggesting falling snow without forming a full snowflake picture. The shape is oval, which keeps the frost effect soft. The length is medium, so the dots have room to spread naturally. The finish is glossy with a light shimmer, not a heavy glitter, so the design stays elegant. This style suits a winter wedding guest look, a New Year lunch and anyone who prefers silver to gold. It pairs well with silver jewellery, grey knitwear and pale blue or white clothing. To recreate it, paint the silver-white tip first, then use the end of a dotting tool to place dots in different sizes. Put larger dots near the tip and smaller dots lower down, so the snow effect looks natural.
8. Red and Green Plaid Tips
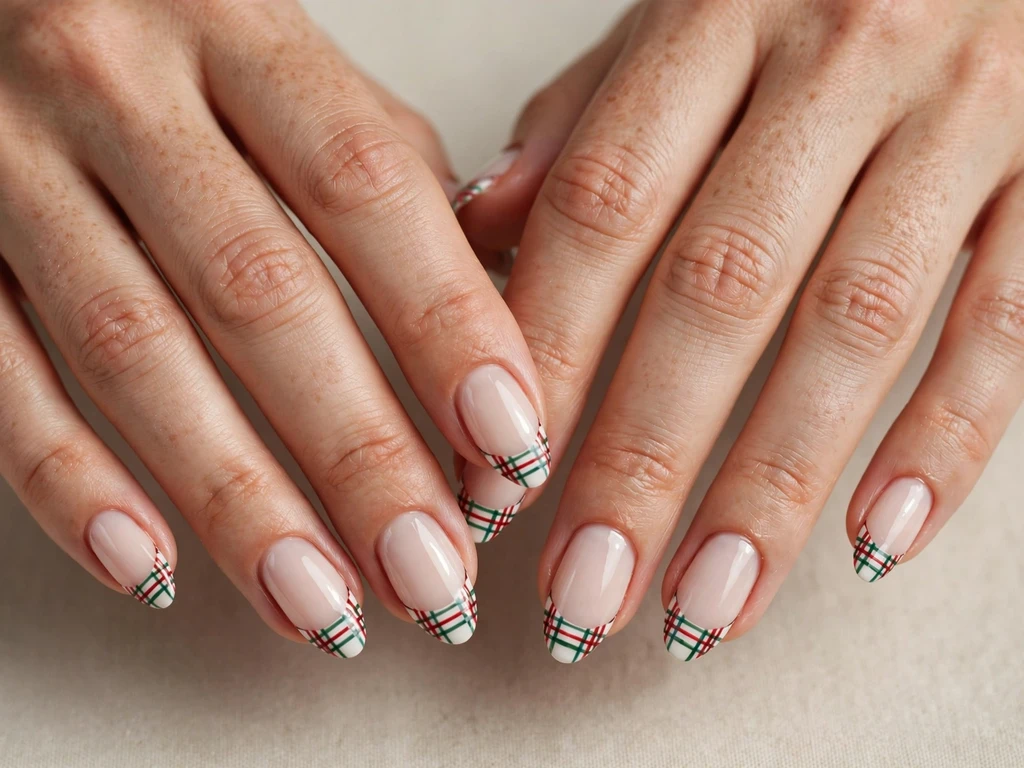
This design brings a cosy, cabin-style pattern to the French tip without covering the whole nail. A milky base keeps the look light, while the tip is painted as a small plaid panel in red, green and white lines. The plaid follows the French curve, so the classic tip shape is still visible. The shape is almond, which gives the plaid panel enough width to show the crossed lines clearly. The length is medium to long, because a very short tip can make plaid look cramped. The finish is glossy, which keeps the thin plaid lines sharp. This style suits a Christmas market visit, a cosy family gathering and a holiday photo. It pairs well with plaid scarves, red knitwear and dark jeans or a simple dress. To recreate it, paint the tip red first, add green vertical lines, then add thin white horizontal lines on top. Let each layer dry briefly before adding the next, so the lines do not smudge.
9. Gingerbread Tips with White Icing Lines
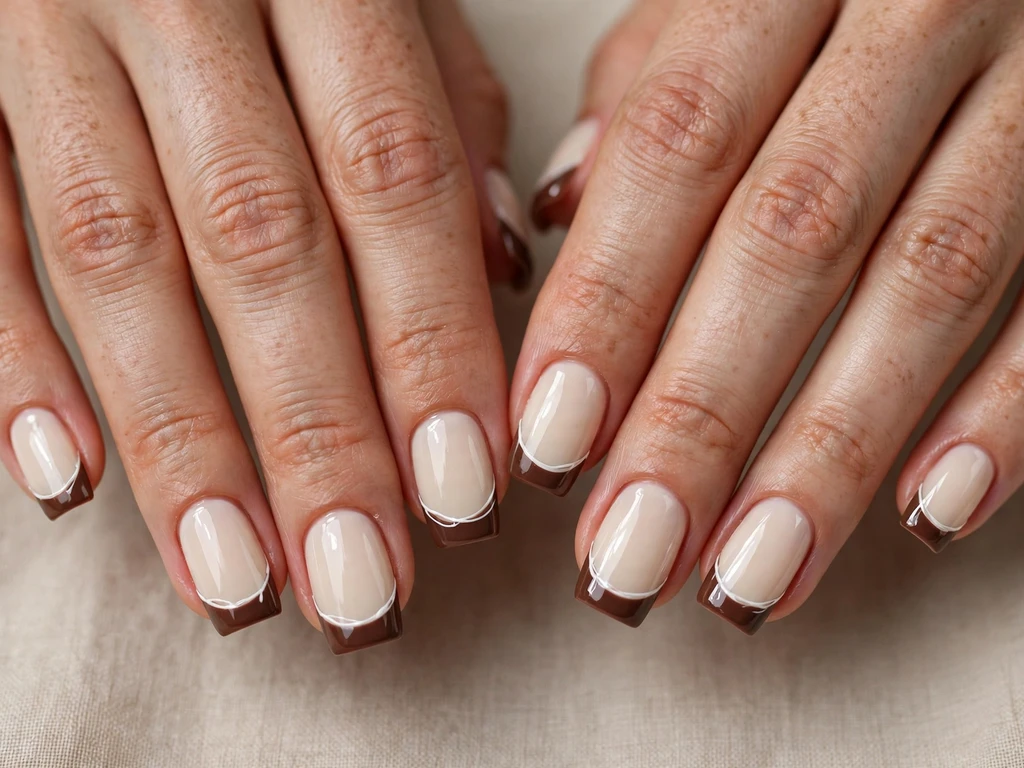
This design takes its colours from gingerbread: warm brown tips, a cream base and thin white lines that look like piped icing. The French tip is a soft chocolate brown band, and a delicate white zigzag or scallop line runs along the edge where the tip meets the base. The shape is square, which suits the neat, cookie-like lines. The length is medium, so the icing line has space to stay clear. The finish is glossy, which makes the brown look rich rather than flat. This style suits a baking day, a Christmas party with a playful dress code and anyone who wants a sweet, unusual design. It pairs well with cream, brown and burgundy clothing. To recreate it, paint the brown tip first, then use a very fine brush for the white icing line. Keep the line thin and steady, and do not add extra dots or art, because the icing line is the hero detail.
10. Reindeer Accent with a Red Nose Tip
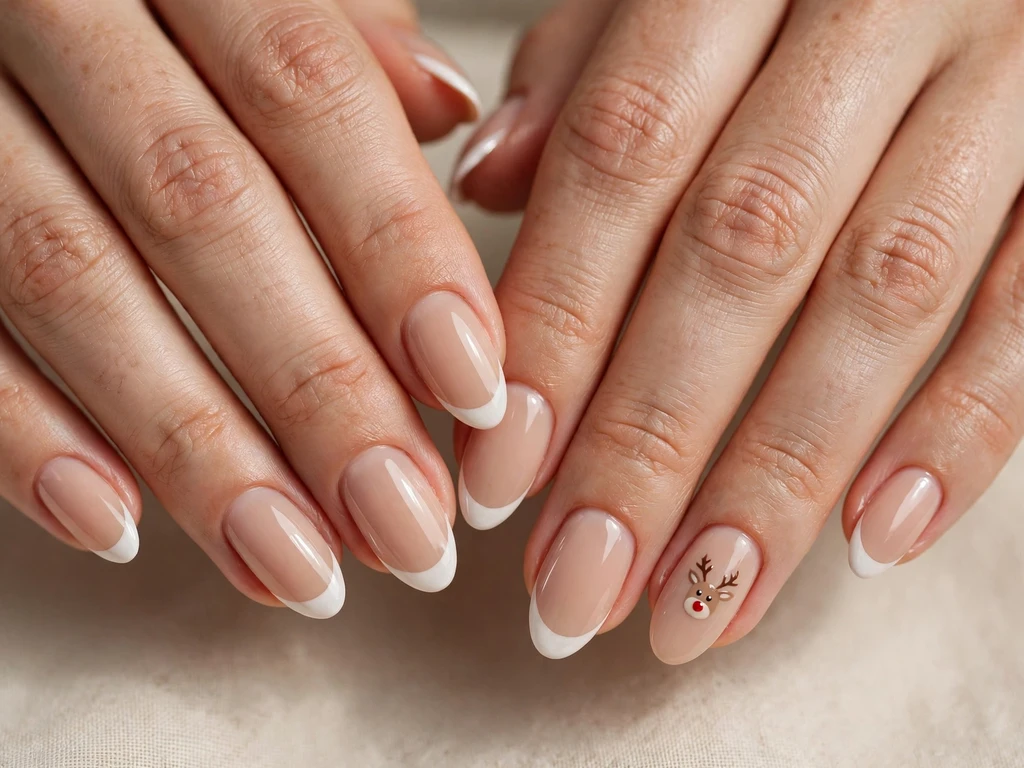
This design is cheerful and best kept to one accent nail, so the rest of the manicure stays elegant. Most nails have a nude base and a classic white French tip. On the ring finger, the tip is shaped slightly wider and a tiny reindeer face is painted in brown, with small antlers above the tip line and one small red dot as the nose. The shape is almond, which gives the accent nail a natural, face-like curve. The length is medium, so the reindeer detail does not crowd the nail. The finish is glossy, which keeps the brown and red looking clean. This style suits a family Christmas, a festive lunch and anyone who wants one fun detail for photos. It pairs well with brown, cream and red clothing. To recreate it, paint the reindeer face only after the white tip is fully dry, and keep the antlers as two simple curved lines. If the face feels too detailed, use a reindeer sticker on the accent nail instead.
11. Santa Hat Tips on a White Base
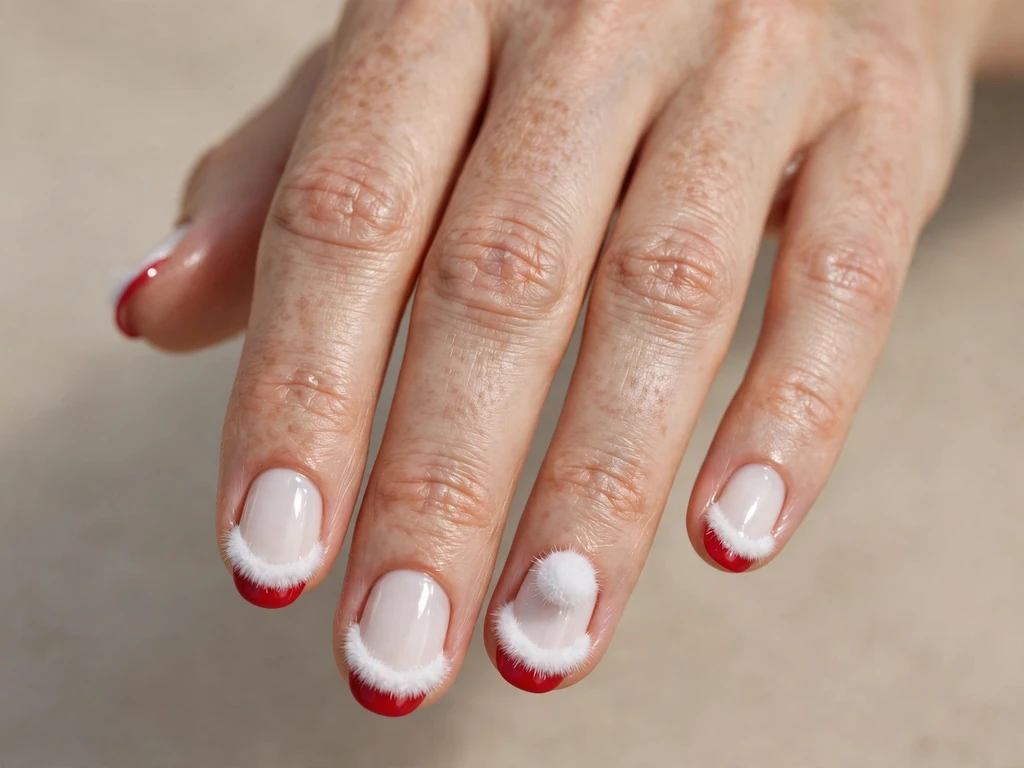
This design uses the Santa hat as a tip shape rather than as a full picture. A white base covers the nail, while the French tip is painted red and finished with a small white fluffy band along the smile line. On one accent nail, a tiny white pom-pom dot sits at the outer corner, completing the hat effect. The shape is oval, which keeps the hat curve soft. The length is medium, so the red tip and white band have room to read clearly. The finish is glossy, which makes the red look bright and festive. This style suits a Christmas party, a family photo and a playful holiday outfit. It pairs well with red, white and black clothing. To recreate it, paint the red tip first, then add a slightly thicker white line along the smile line to suggest the hat trim. Add the pom-pom dot last, using a dotting tool, and seal with a top coat so the white band does not smudge.
12. Mistletoe Tips with Green Leaves
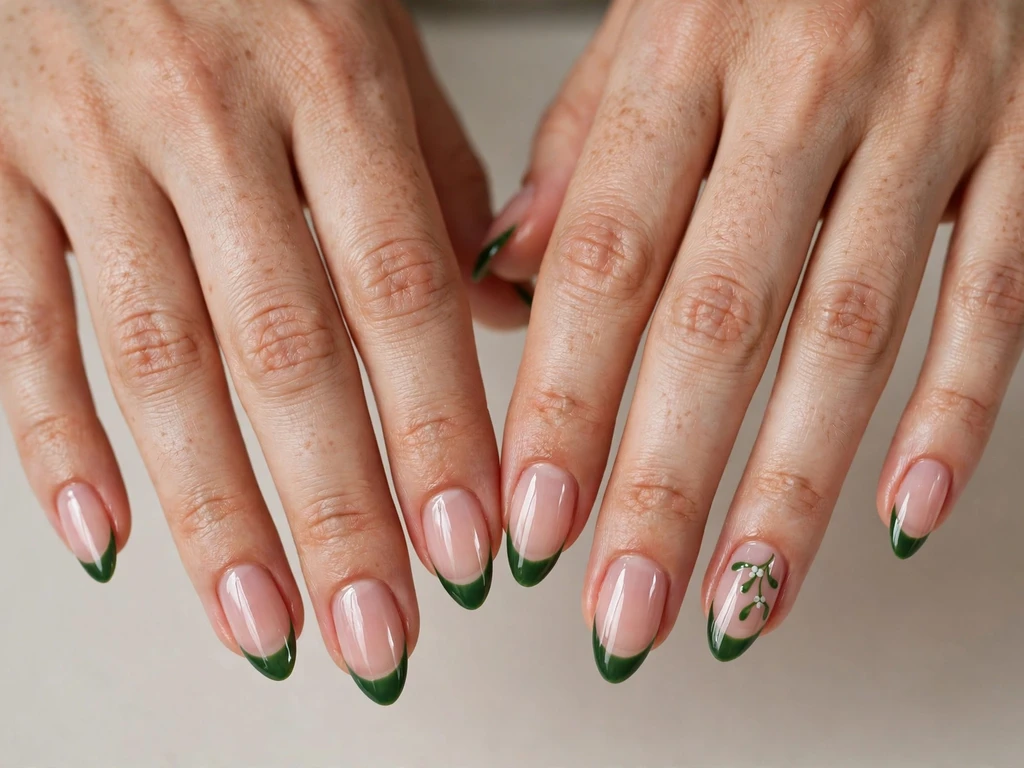
This design is romantic, subtle and different from a standard red or green tip. A sheer pink base keeps the nail soft, while the French tip is a deep green band. On one accent nail, two small green leaves and three tiny white berries sit just below the tip, suggesting mistletoe without a large painted scene. The shape is almond, which suits the leaf shape. The length is medium, giving the mistletoe detail space to sit clearly. The finish is glossy, which makes the green look rich and the white berries stand out. This style suits a Christmas date night, a holiday party and a romantic Christmas Eve look. It pairs well with green, cream and gold clothing. To recreate it, paint the green tip first, then add the leaves with a small brush and the berries with a dotting tool. Keep the mistletoe on one nail only, so the design stays elegant rather than busy.
13. Ornament Bauble Tips in Red and Gold
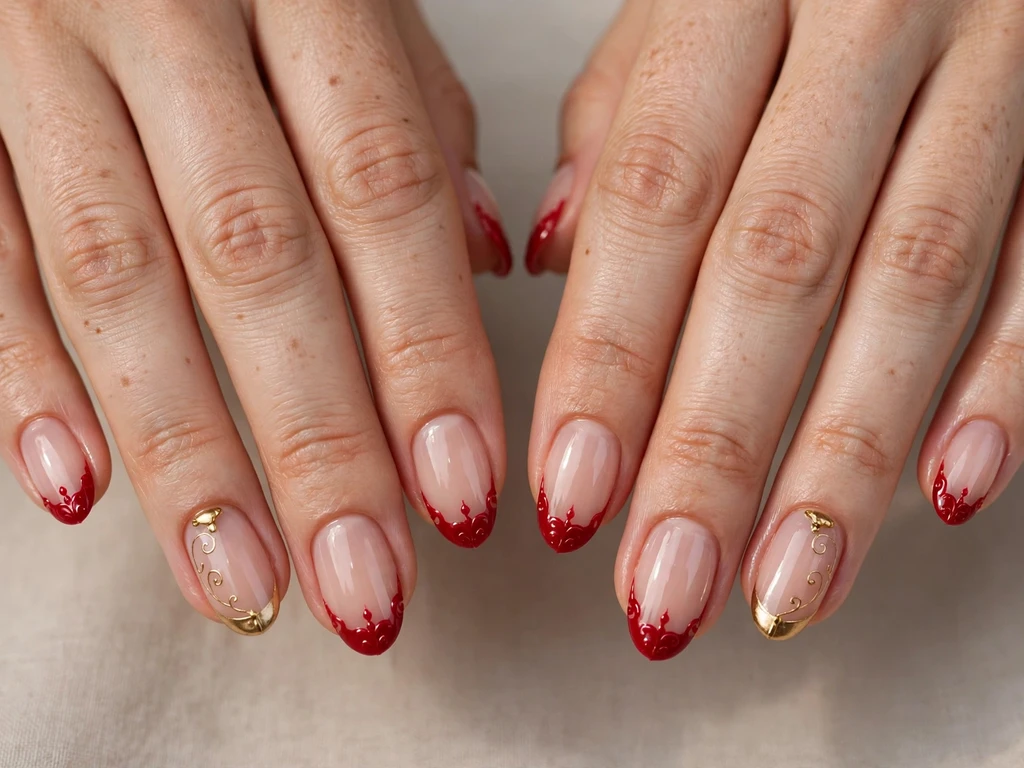
This design turns the French tip into a hanging ornament. A nude base keeps the nail calm, while the tip is a rounded red band that looks like the lower half of a bauble. A thin gold line curves above the tip, and a tiny gold dot sits at the top of the accent nail to suggest the ornament cap. The shape is round, which matches the bauble curve. The length is medium, so the ornament shape has room to look complete. The finish is glossy, with a light gold shimmer on the cap detail. This style suits a Christmas party, a tree-decorating evening and a festive dinner. It pairs well with red, gold and black clothing. For more gold tip ideas, see https://thefrenchtipnails.com/gold-french-tip-nails/. To recreate it, paint the red tip in a rounded shape rather than a sharp smile line, then add the gold curve carefully with a fine brush. Keep the bauble on two accent nails at most, and leave the other nails as simple red tips.
14. Champagne Gold Tips for Christmas Eve

This design is the most elegant option in the guide and works when you want Christmas sparkle without bright colour. A milky nude base softens the nail, while the French tip is a warm champagne gold band with a fine, even edge. There is no painted art, so the beauty comes from the colour, the clean smile line and the glossy shine. The shape is almond, which elongates the hand and suits formal wear. The length is medium to long, giving the champagne tip space to look luxurious. The finish is glossy and metallic, but not heavy glitter, so it reads as refined rather than flashy. This style suits Christmas Eve dinner, a formal party and a New Year celebration. It pairs well with champagne, cream, black and gold clothing, and with delicate gold jewellery. To recreate it, use two thin coats of champagne polish for the tip, and clean the smile line with a flat brush dipped in polish remover before sealing. A neat edge matters more than extra decoration here.
15. Deep Burgundy Tips with Gold Foil Flecks

This design is rich, moody and perfect for readers who find bright red too bold. A sheer nude base keeps the nail natural, while the French tip is a deep burgundy band. Small, irregular gold foil flecks are pressed onto the tip, mainly near the outer edge, so the design looks like scattered gold leaf rather than a pattern. The shape is coffin, which suits the deep colour and gives the foil room to show. The length is long, because burgundy and foil need space to avoid looking dark and cramped. The finish is glossy, which seals the foil and makes it shine. This style suits a formal Christmas dinner, a winter wedding and an evening party. It pairs well with burgundy, black, gold and deep green clothing. To recreate it, paint the burgundy tip first, then press tiny foil pieces onto the wet top coat with tweezers. Seal with a glossy top coat, and avoid placing foil on every nail in the same position.
16. Icy Blue Frost Tips with Silver Glitter
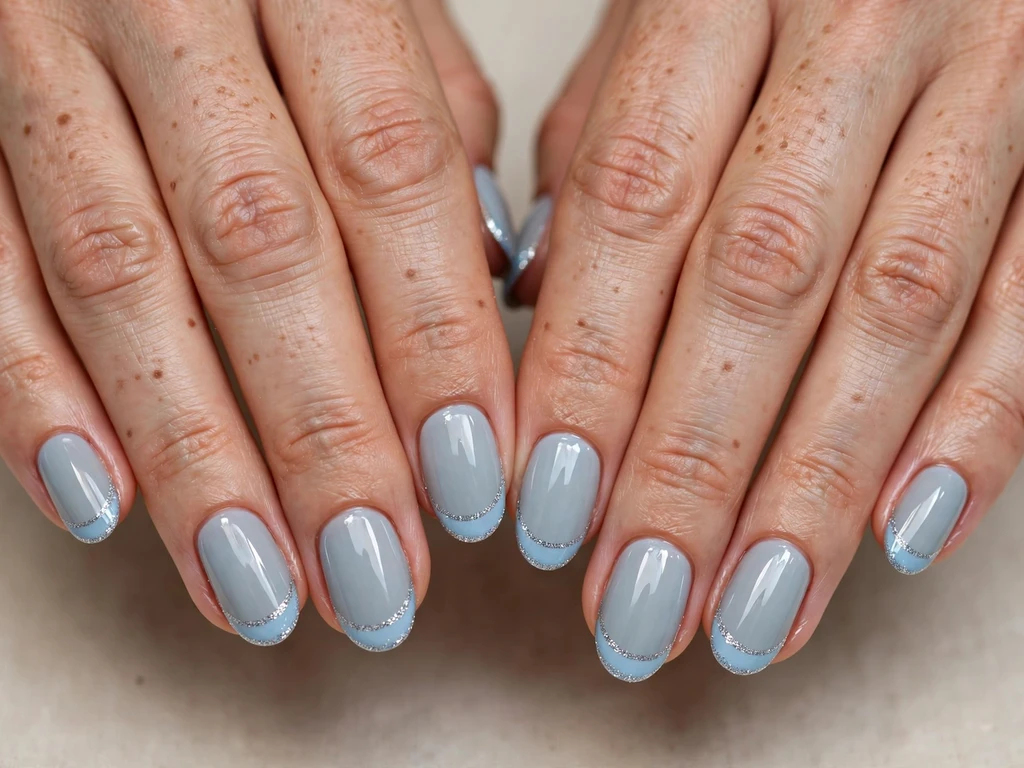
This design brings a cold, frosty winter feeling to Christmas without using traditional red or green. A pale blue-grey base keeps the nail cool, while the French tip is an icy blue band with a light silver glitter dusting on the outer edge. The glitter is fine, not chunky, so the tip looks like frost rather than a party glitter nail. The shape is oval, which softens the cool colours. The length is medium, giving the icy tip enough space to show the gradient from blue to silver. The finish is glossy, which helps the frost effect look clear and bright. This style suits a winter party, a New Year look and anyone who prefers cool tones. It pairs well with silver jewellery, white, grey and pale blue clothing. To recreate it, paint the icy blue tip first, then sponge a small amount of fine silver glitter only onto the outer third of the tip. Seal with a top coat to smooth the glitter and prevent a rough edge.
17. Peppermint Swirl Tips in Red and White
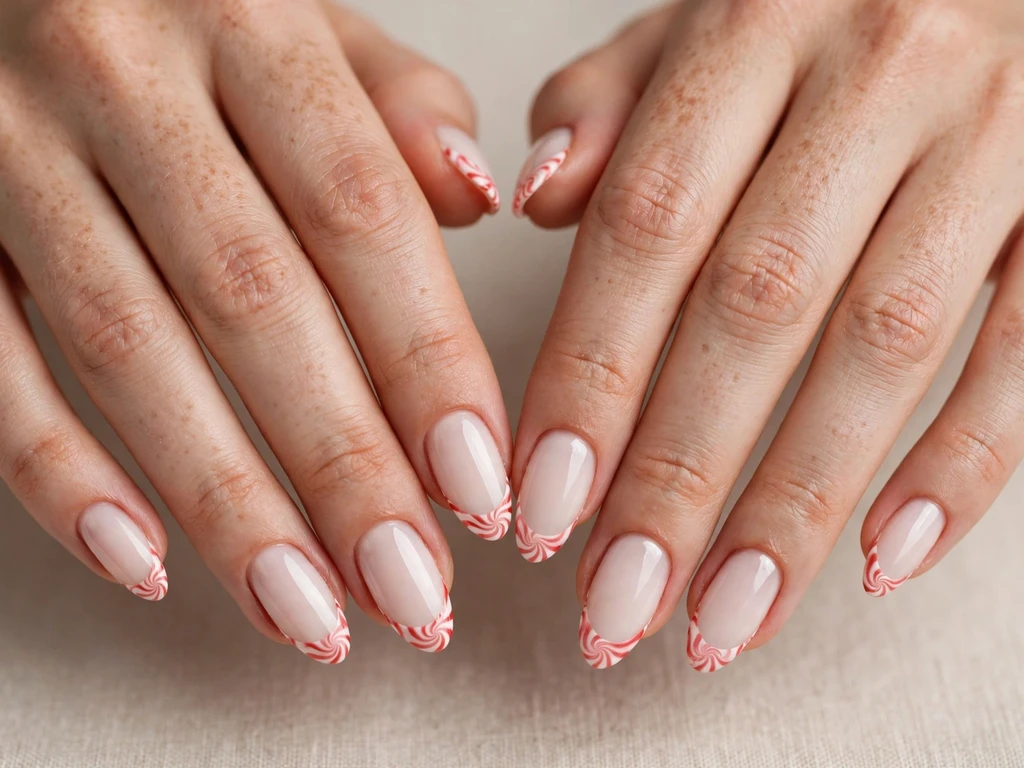
This design is different from candy cane stripes because the pattern is a soft swirl, not a straight stripe. A white base covers the nail, while the French tip is painted with a gentle red swirl that curves across the tip like peppermint candy. The swirl is wider on one side and narrower on the other, so each nail looks slightly different while still matching as a set. The shape is almond, which suits the curved swirl. The length is medium, because a very short tip can make the swirl look crowded. The finish is glossy, which makes the red and white contrast look smooth. This style suits a Christmas party, a festive brunch and a playful holiday outfit. It pairs well with red, white and pink clothing. To recreate it, paint the tip white first, then draw one red curved line across the tip with a thin brush and soften it slightly with a clean brush. Do not add stripes as well, because the swirl is the hero pattern.
18. White Tips with a Gold Star Accent
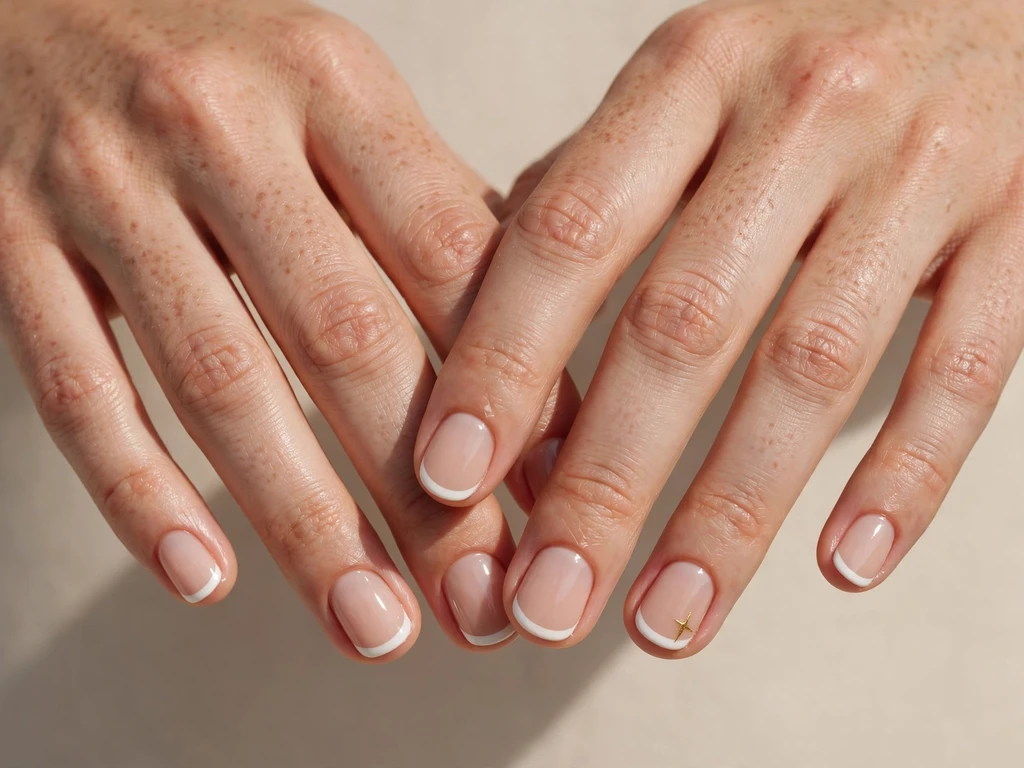
This design is ideal for short nails and for readers who want a classic French tip with one tiny Christmas detail. A nude base keeps the nail natural, while the French tip is a clean white band. On one accent nail, a small gold star sits just below the tip line, centred on the nail. The star is the only art in the set, so the manicure stays elegant and work-appropriate. The shape is short and round, which makes the star look balanced. The length is short, and the design works because the star is small and does not need extra space. The finish is glossy, which makes the gold star shine without looking heavy. This style suits work, family gatherings and Christmas Day itself. It pairs well with gold jewellery and any Christmas outfit. To recreate it, use a small gold star sticker or paint a simple five-point star with a fine brush. Place the star slightly off-centre if you want a more modern look, but keep it on one nail only.
19. Cranberry Tips with Pearl Accents
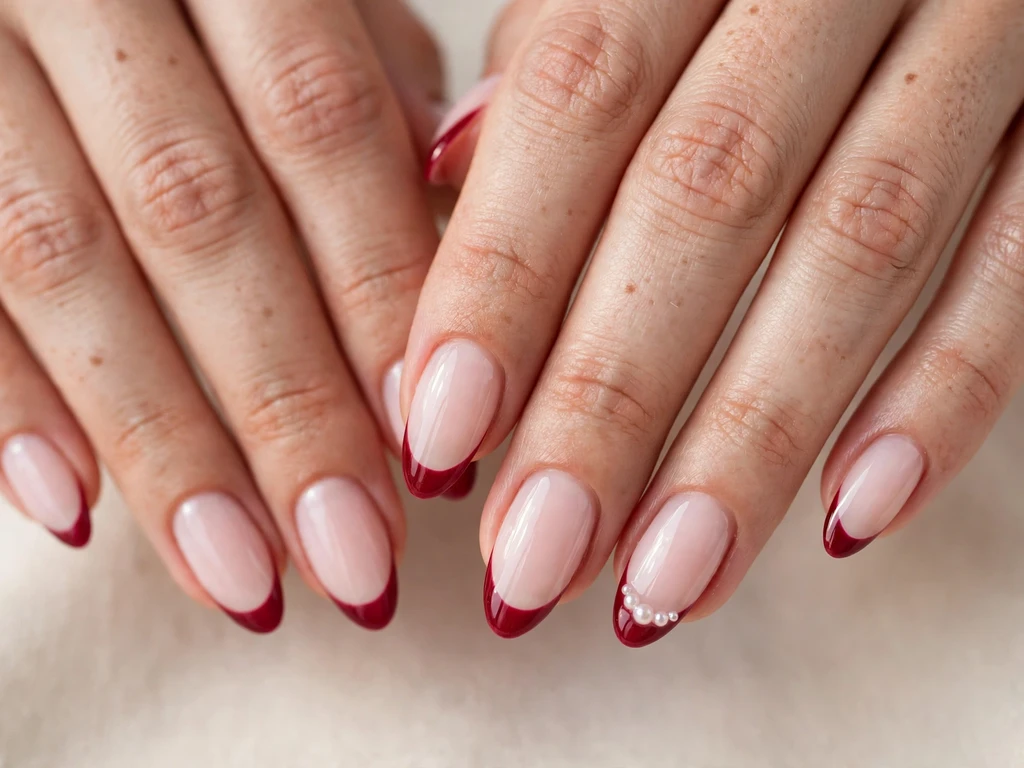
This design is soft, romantic and less bright than classic red. A milky pink base warms the nail, while the French tip is a muted cranberry band. On one accent nail, three tiny pearls are placed in a small curve just below the tip line, like a delicate piece of jewellery. The shape is almond, which suits the pearl detail. The length is medium, giving the pearls room to sit without crowding the tip. The finish is glossy, which makes the cranberry look rich and the pearls look polished. This style suits a Christmas dinner, a winter wedding guest look and a romantic holiday evening. It pairs well with cranberry, cream, gold and blush clothing. To recreate it, paint the cranberry tip first, then place the pearls with tweezers onto a dot of top coat. Use pearls of the same size, and seal gently so they stay in place without losing their shine.
20. Pine Branch Tips with Gold Beads
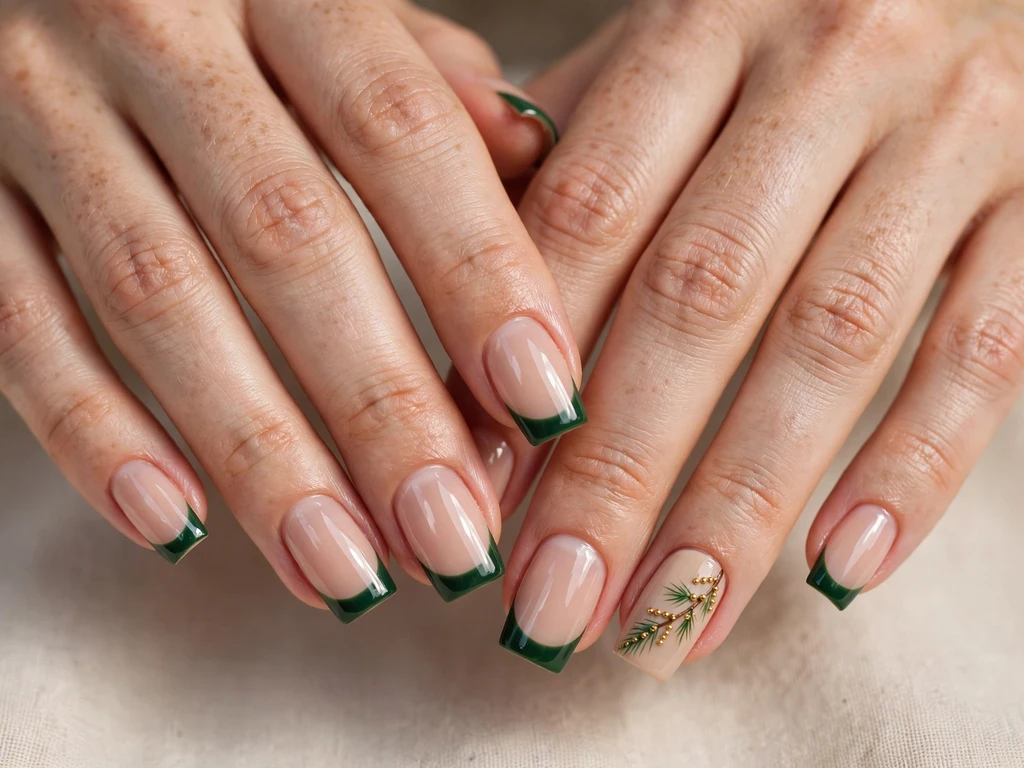
This design uses a natural pine branch as the hero detail, rather than a full tree or a wreath. A nude base keeps the nail calm, while the French tip is a deep green band. On one accent nail, a thin pine branch is painted diagonally across the tip, with tiny gold dots along the branch to suggest small baubles. The shape is square, which gives the branch a clean, straight path. The length is medium, so the branch does not look squeezed. The finish is glossy, which makes the green and gold look fresh. This style suits a Christmas dinner, a nature-inspired holiday outfit and anyone who wants an elegant botanical detail. It pairs well with green, gold, cream and brown clothing. To recreate it, paint the branch as one thin diagonal line first, then add short side strokes for pine needles. Add the gold dots last, using a dotting tool, and keep the branch on one nail only.
21. Midnight Navy Tips with Gold Snowflakes
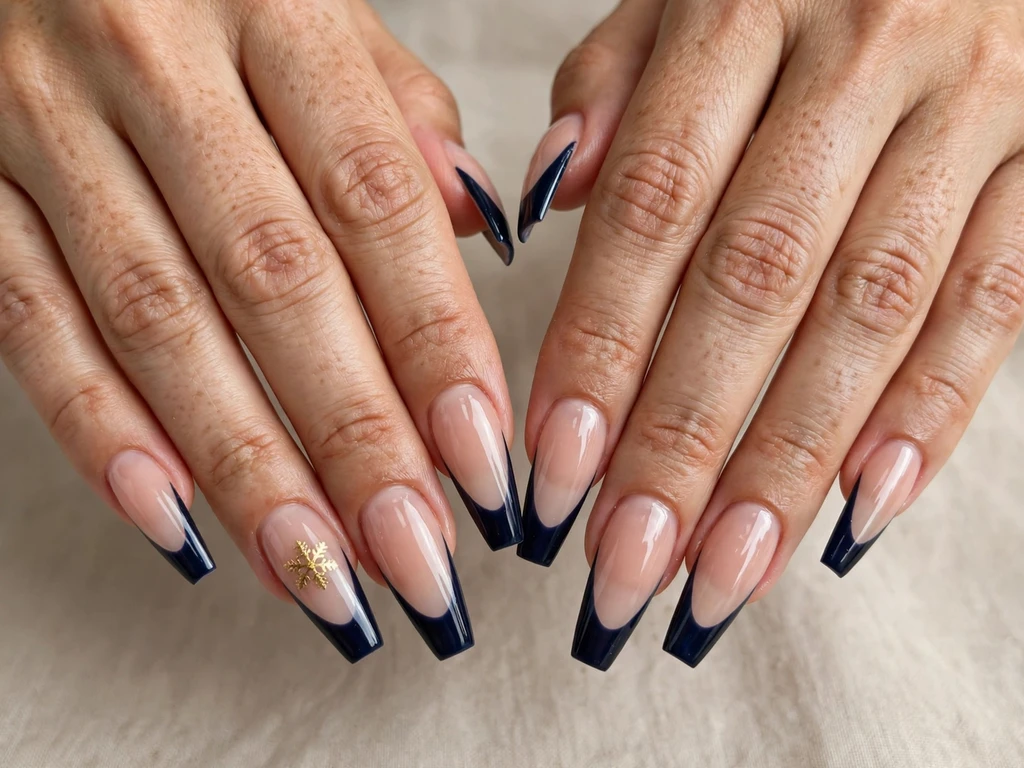
This design is dramatic, elegant and a strong alternative to red for evening Christmas events. A sheer nude base keeps the nail grounded, while the French tip is a deep midnight navy band. On one accent nail, a small gold snowflake is painted over the navy tip, so the gold stands out clearly against the dark colour. The shape is coffin, which suits the bold navy and gives the snowflake room. The length is long, because navy tips can look heavy on very short nails. The finish is glossy, which deepens the navy and makes the gold snowflake shine. This style suits a formal Christmas party, New Year Eve and a winter evening event. It pairs well with navy, black, gold and silver clothing. To recreate it, paint the navy tip first and let it dry fully, then paint the snowflake with a fine brush in gold. Keep the snowflake small and centred, and leave the other nails as plain navy tips.
22. Sugar Cookie Cream Tips with Tiny Sprinkles

This design is sweet, light and different from a plain white French tip. A cream base covers the nail, while the French tip is a soft sugar-cookie cream band, slightly warmer than white. Tiny multicoloured sprinkle dots are scattered only on the tip of one accent nail, like sprinkles on a cookie. The shape is round, which suits the soft, cookie-like colours. The length is short to medium, so the sprinkles do not overwhelm the nail. The finish is glossy, which makes the cream look fresh and the sprinkles look clean. This style suits a baking day, a family Christmas and a playful holiday outfit. It pairs well with cream, pink and red clothing. To recreate it, paint the cream tip first, then place the sprinkle dots with a dotting tool in red, green, gold and white. Use only a few dots per accent nail, and seal with a top coat so the dots do not catch on clothing.
23. Velvet Red Tips with a Matte Finish
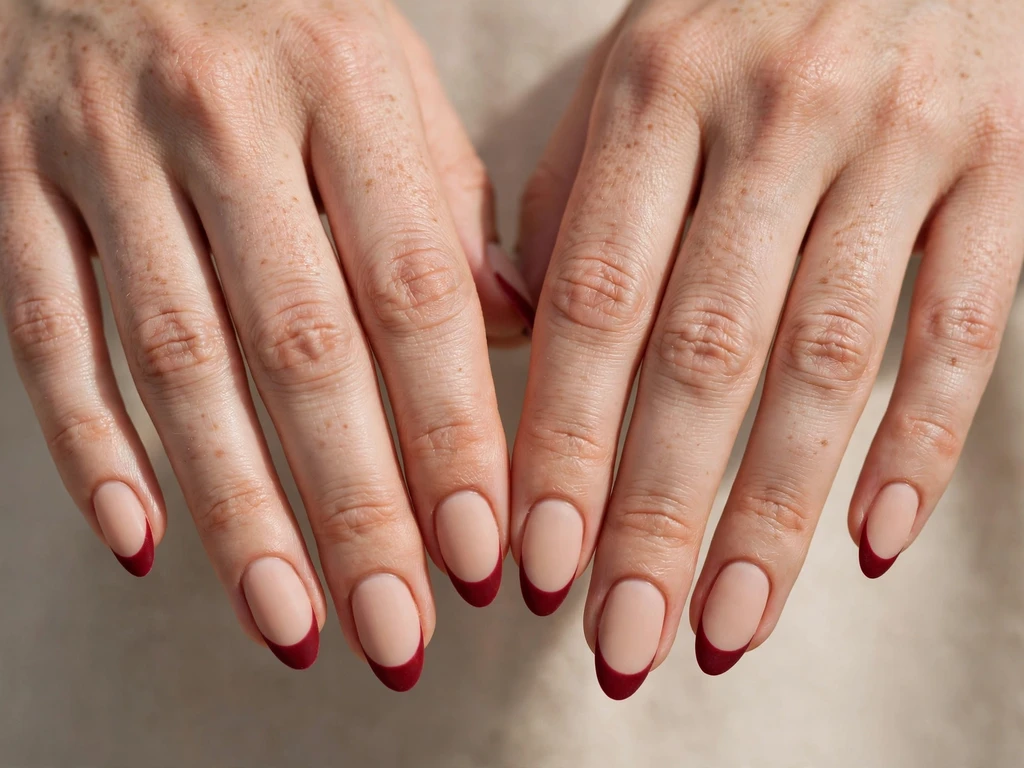
This design is the softest red in the guide, because the matte finish removes shine and gives the tip a velvet fabric feel. A nude base keeps the nail natural, while the French tip is a deep red band finished with a matte top coat. There is no glitter, foil or painted art, so the texture itself is the design. The shape is almond, which suits the soft red. The length is medium, giving the matte tip enough space to look even. The finish is matte, which sets it apart from the glossy red designs. This style suits a cosy Christmas dinner, a winter photo and anyone who prefers texture over sparkle. It pairs well with velvet clothing, knitwear and gold jewellery. For more matte tip ideas, see https://thefrenchtipnails.com/matte-french-tip-nails/. To recreate it, paint the red tip with a glossy polish first, then apply a matte top coat only over the tip, not the whole nail, if you want the base to stay slightly glossy. Keep hands away from oil until the matte coat is fully dry.
24. Tinsel Silver Tips with Holographic Sparkle
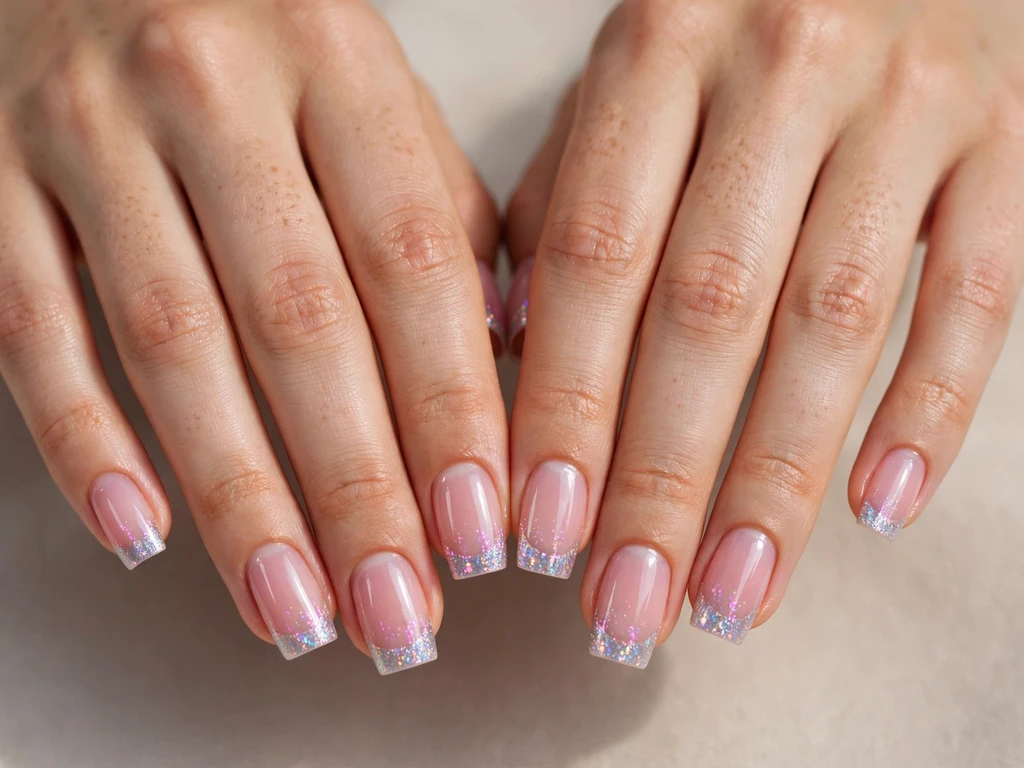
This design is made for party nights, when you want maximum sparkle in a French tip shape. A sheer pink base keeps the nail soft, while the French tip is a silver band with fine holographic glitter that shifts between silver, pink and blue in the light. The glitter is dense on the tip but stops cleanly at the smile line, so the French shape stays clear. The shape is square, which gives the tinsel tip a sharp, modern edge. The length is medium to long, because holographic glitter needs space to show its colour shift. The finish is glossy, which seals the glitter and smooths the surface. This style suits a Christmas party, New Year Eve and a festive night out. It pairs well with silver jewellery and black, white or metallic clothing. To recreate it, use a holographic silver polish for the tip in two thin coats, rather than loose glitter, for a smoother finish. Seal with a glossy top coat and avoid filing the tip after the glitter is sealed.
25. Cozy Sweater Knit Tips in Cream and Red
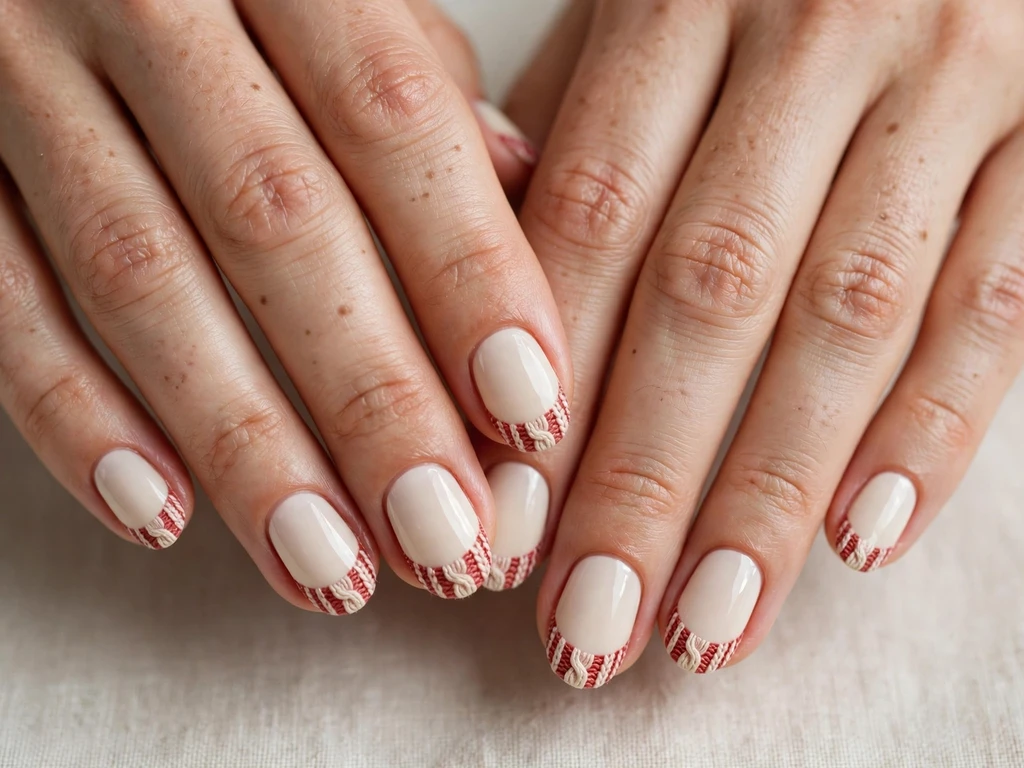
This design is the cosiest in the guide, because the tip carries a subtle knit texture instead of a flat colour. A cream base covers the nail, while the French tip alternates between cream and soft red, with a fine knit-like pattern of small diagonal and cross stitches painted on the tip. The pattern is kept very light, so it reads as texture from a normal distance rather than as a busy picture. The shape is oval, which suits the soft knit effect. The length is short to medium, making it practical for cosy winter days. The finish is glossy, but with a soft, non-glitter shine, so the knit pattern stays visible. This style suits a family Christmas, a winter weekend and a cosy sweater outfit. It pairs well with cream, red and grey knitwear. To recreate it, paint the tip cream first, then add the knit stitches with a very fine brush in red on alternate nails. Keep the stitches small and evenly spaced, and seal with a top coat to protect the fine lines.
Styling advice: shape, length and occasion
Shape guidance
- Almond: Best for most Christmas designs in this guide, especially tree, mistletoe, cranberry and champagne tips, because the tapered shape elongates the hand.
- Square: Best for candy cane stripes, gingerbread icing lines, pine branches and tinsel tips, where a straight edge keeps lines clean.
- Oval: Best for classic red, snowflake, silver frost and sweater designs, where a soft curve keeps the look gentle.
- Round: Best for short nails, ornament tips and sugar cookie designs, where a rounded tip matches the motif.
- Coffin: Best for burgundy foil and midnight navy designs, where length and drama suit an evening event.
Length guidance
- Short nails: Choose thin tips, glitter fades, white tips with a gold star, snowflake tips and sweater tips. Avoid deep plaid panels and large painted scenes.
- Medium nails: Most designs in this guide work well, including plaid, candy cane, tree and pine branch designs.
- Long nails: Choose deeper tips, foil, navy and tinsel designs, where extra space keeps the pattern clear.
Occasion guidance
- Work party: Classic red with a gold line, gold glitter fade, champagne gold, white tips with a gold star, and velvet red.
- Family Christmas: Snowflake tips, gingerbread tips, sugar cookie tips, sweater tips and reindeer accents.
- Christmas Eve dinner: Champagne gold, cranberry with pearls, burgundy with gold foil, and midnight navy with gold snowflakes.
- New Year: Gold glitter fade, silver frost, icy blue frost and tinsel silver tips, which carry easily from Christmas into New Year.
For more ideas in related finishes, see the homepage at https://thefrenchtipnails.com/, the micro French tip collection at https://thefrenchtipnails.com/micro-french-tip-nails/, and the ombre French tip collection at https://thefrenchtipnails.com/ombre-french-tip-nails/ — use these only where the reader wants a thinner tip or a softer fade, not as a replacement for a Christmas design.
Frequently asked questions about Christmas French tip nails
How far before Christmas should I get Christmas French tip nails?
Get them 2 to 4 days before your main event if you want them to look freshest, or up to a week before if you choose gel, a glitter fade or a simple tip that hides small chips well. Avoid booking on the morning of a big event, because you need time for the polish to dry and settle.
Can I wear Christmas French tip nails to work?
Yes, if you choose a quiet design. A thin red tip, a white tip with a gold star, a snowflake tip on a milky base or a gold glitter fade all read as festive without looking like a costume. Save plaid, reindeer and Santa hat designs for parties and family days if your workplace is formal.
What is the best Christmas French tip design for short nails?
A gold glitter fade, a white tip with a gold star, a snowflake tip on a milky base and a cozy sweater tip all work well on short nails. They use a thin tip or a soft fade, so the nail bed does not look smaller. Avoid deep plaid panels and large painted trees on very short nails.
How can I make Christmas French tip nails last until New Year?
Choose gel or a strong top coat, keep the tip thin, and pick glitter, foil or a fade design, because these hide small chips better than a flat colour tip. Wear gloves for washing up, avoid using nails as tools, and add a fresh top coat after 4 to 5 days to refresh the shine.
Can I do Christmas French tip nails at home without stickers?
Yes. A classic red tip, a gold glitter fade and a simple white tip with a gold line are all possible with a thin brush and patience. For snowflakes, trees and reindeer, stickers or a dotting tool make the design much easier, especially on your non-dominant hand. Practice the accent nail first before painting the full set.
What base colour works best under a Christmas French tip?
A sheer pink base suits red, gold and burgundy tips. A milky white base suits snowflake, silver and icy blue tips. A nude base close to your natural nail colour suits navy, green and foil tips, because it keeps a bold tip looking polished. Test one nail in daylight if you are unsure.
How do I remove glitter Christmas French tip nails without damaging my nails?
Soak a cotton pad in remover, place it on the nail, wrap it in foil for 10 to 15 minutes, then gently slide the glitter off. Do not peel or scrape glitter tips, because that can lift layers of the natural nail. Follow with cuticle oil and a strengthening base coat.
What if I do not like red and green for Christmas?
You do not need red or green to look festive. Champagne gold, icy blue frost, silver frost, midnight navy with gold snowflakes and cranberry with pearls all read as Christmas through sparkle, foil or a seasonal detail, without the traditional red and green combination.
Are Christmas French tip nails suitable for a winter wedding?
Yes, especially champagne gold, cranberry with pearls, silver frost and white tips with a gold star. These designs photograph well, match formal clothing and do not compete with a wedding outfit. If you are a guest, avoid a bright Santa or reindeer design unless the wedding dress code is playful.
Final thoughts
Christmas French tip nails work because they keep the classic French shape and add just enough festive detail. You do not need the boldest design in this guide to look ready for Christmas — you need the design that fits your nail length, your plans and how long you want the manicure to last. A thin gold line, a single snowflake or a gold glitter fade can be just as festive as a full plaid or ornament set.
Start with one design from this guide, keep one hero detail per manicure, and choose a base colour that flatters your skin tone. If you want a second Christmas look later in December, pick a different hero detail rather than repeating the same tip in a new colour. That way, each manicure feels new, photographs well and still looks like a polished French tip.